Teacher Manual
This manual covers how to get started teaching on iClever Code. With this manual you will know how to create a teacher account, set up your classroom, assign course to your section, manage your students, track their progress, and buy a membership.
This manual includes 7 parts of contents:
As a teacher, the first thing you need to do is to create a teacher account.
-
Create A Teacher Account
If you don't already have a teacher account, start by creating one here. Remember to choose Teacher account type when sign up.
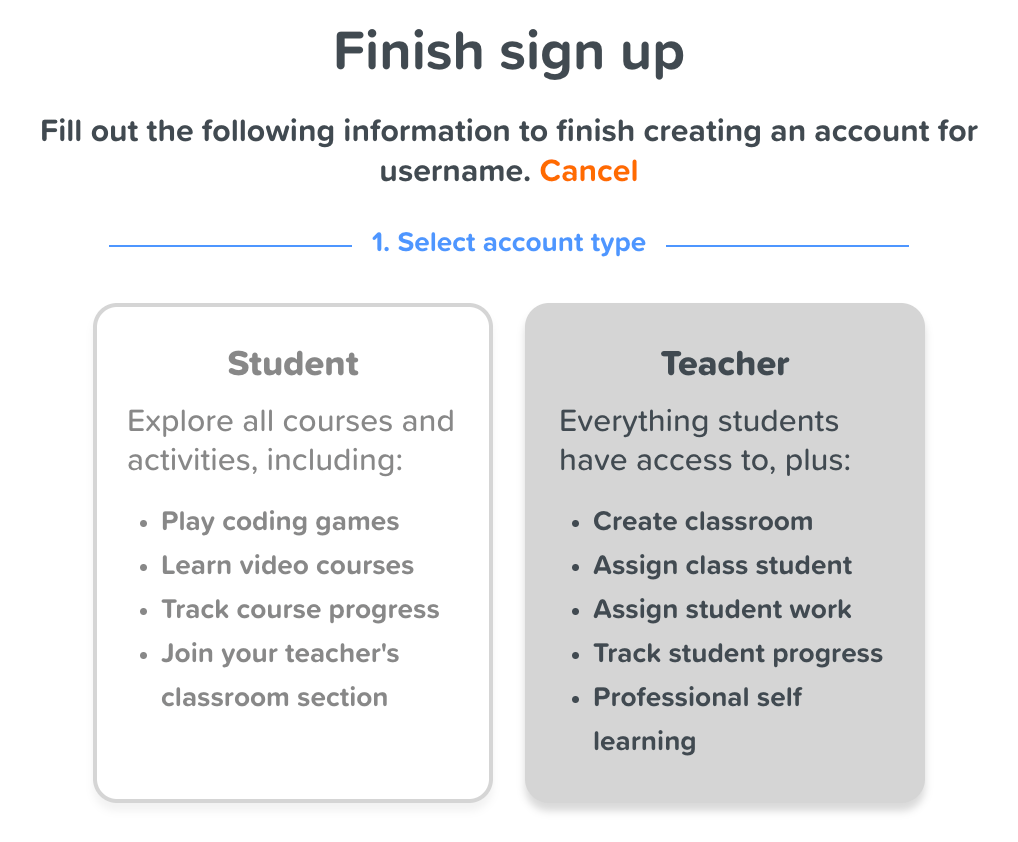
Your teacher account can do everything students have access to. Your teacher account will also allow you to create classroom sections, assign class students, assign students' work, and track students' progress (see which levels and projects they've completed; view their code; and in some cases, leave them feedback on their work).
-
Setup Your Classroom Section
As a teacher, one of the first things you want to do to get started is to set up a classroom section. A classroom section is just a virtual representation of your classroom of students that lets you:
-
Assign a course to your students - who will start at their assigned course when they sign in, which makes it easier to keep them focused and on-track.
-
Manage your students' accounts and help them reset their passwords if needed.
-
Track your students' progress and leave them feedback directly in some courses
We recommend creating a section for each class you teach. If you're a middle school teacher with 3 classes of students, you need to create 3 separate sections, one for each class. Below we will walk you through all the steps for creating a classroom section.
-
Create a section from your Dashboard page
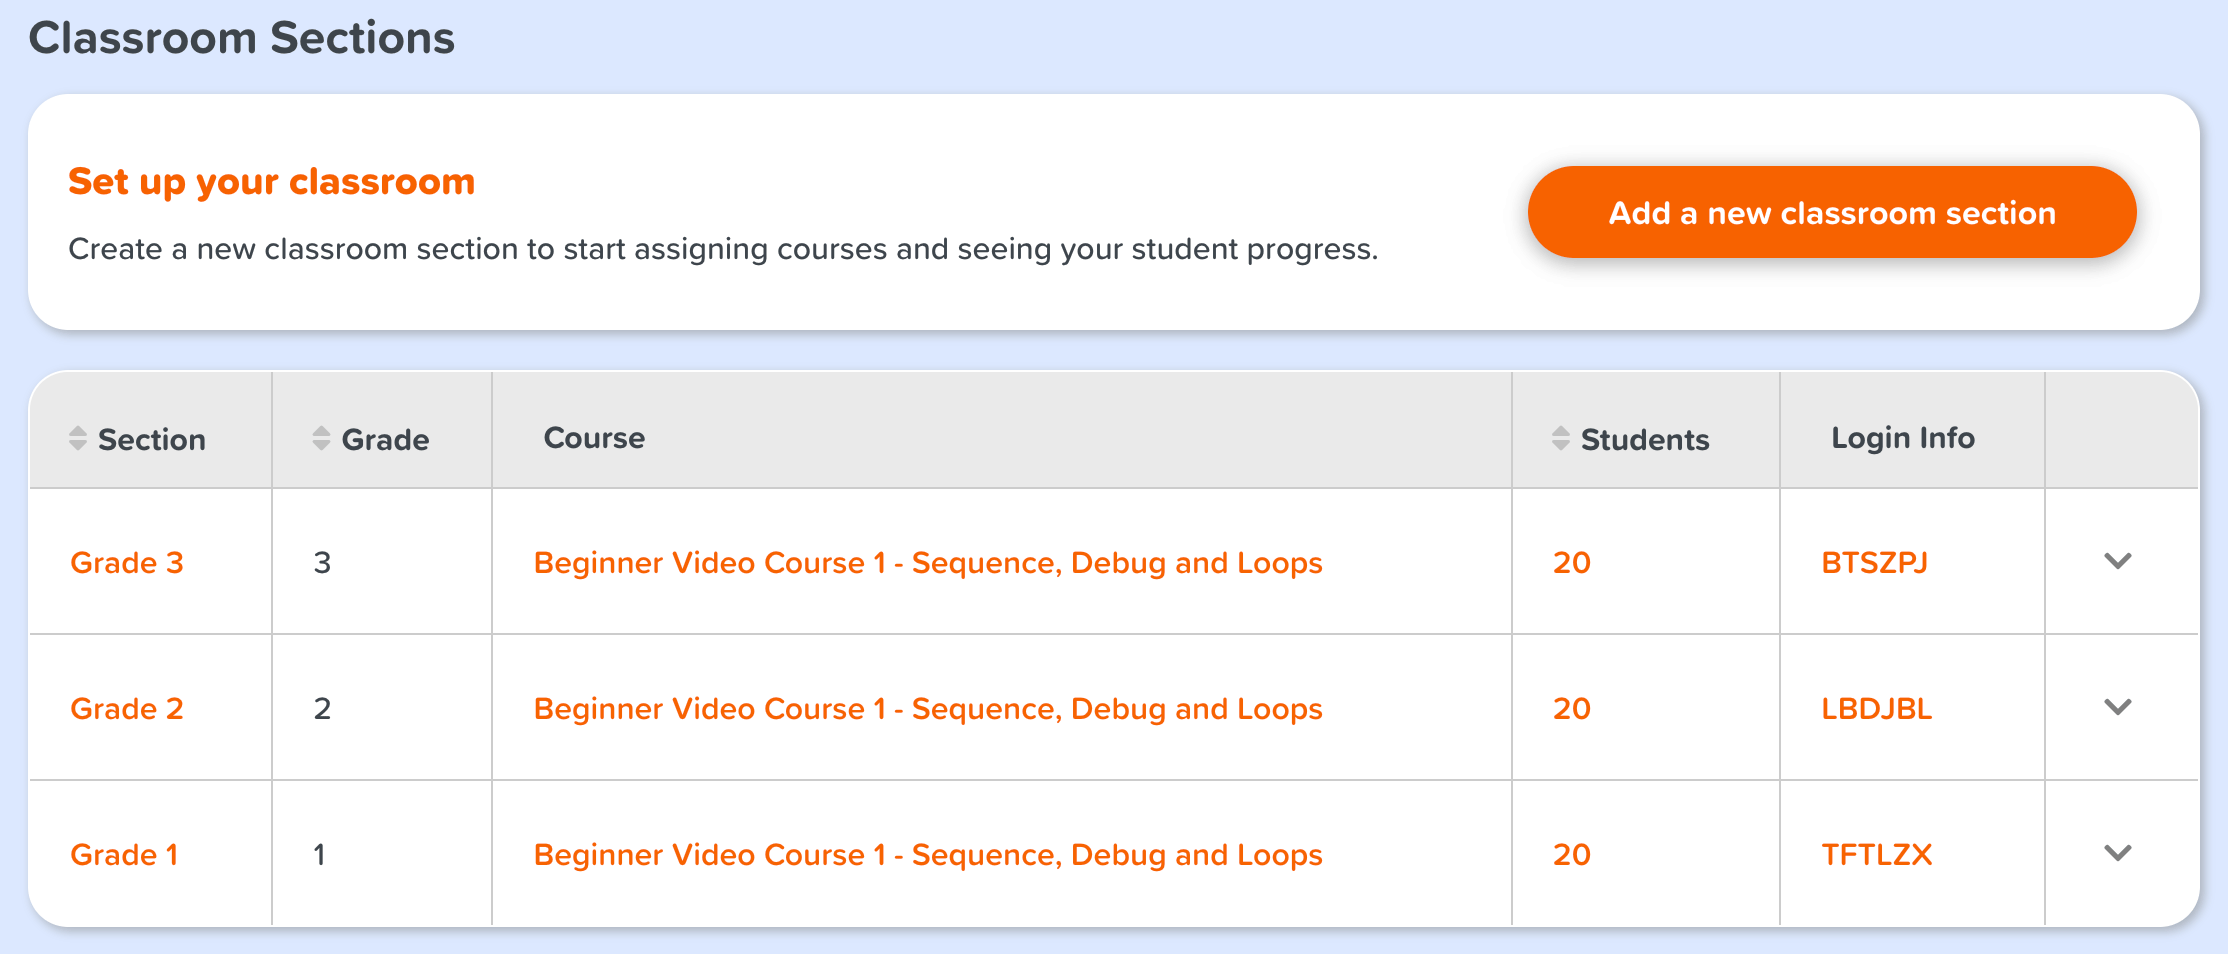
After you're signed in, look for the "Classroom Sections" on your Dashboard Page. This is where you will find any section you've already created, and create new ones. Look for the 'Set up your classroom' banner and click the 'Create a new classroom section' button to get started.

-
Choose how you want your students to sign in
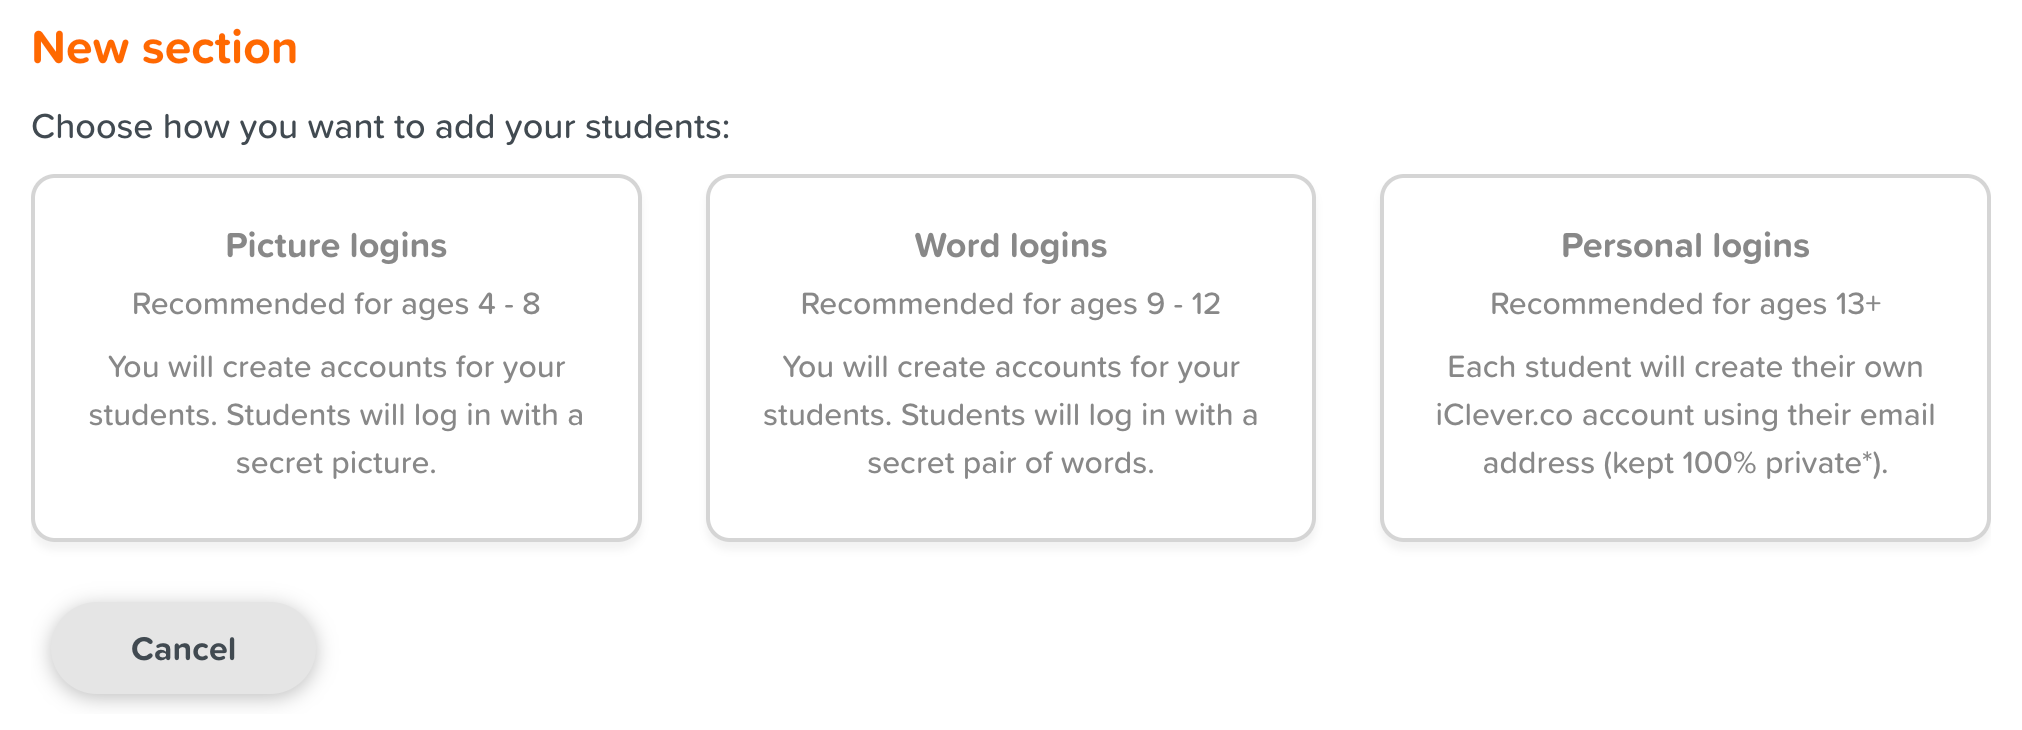
There are different sign options to accommodate various classroom setups and different student ages and abilities. The first decision you’ll be asked to make when you set up your section is how you want your students to log in to iClever Code.
-
Picture password
-
Secret words
-
Personal email
Please notice that:
-
You can only choose the same sign-in option for all students in your same section.
-
Once you've started adding students to your section, you cannot change the sign-in type of it.
Picture Password Logins (Ages 4-8) - use a secret picture as a password:
-
Recommended for pre-readers or students who are still learning to use a mouse and keyboard, and may have trouble with spelling: generally, ages 4-8.
-
You will create accounts for your students, with picture passwords automatically generated for each of them.
-
You can view and reset your students' picture passwords at any time.
Secret Word Logins (Ages 9-12) - use two simple words as the password:
-
Recommended for students who are comfortable with a mouse and keyboard, but who do not have a personal email address yet: generally, ages 9-12
-
You will create accounts for your students and iClever Code will randomly generate different secret word pairs for each student that they can use as their password
-
You can view and reset your students' secret word passwords at any time.
Personal Email Logins (Ages 13+) - are independently created by your students using a personal email address they have access to and a password they create:
-
Recommended for students who are old enough to have and manage their email addresses, as well as set and remember their own passwords.
-
This is also a good option if your students already have their accounts and you want them to still have access to their old work.
-
Instead of manually adding each student to the section yourself, you can send your students a link to join your classroom section once they've signed in with their accounts.
-
You cannot view or reset your students' passwords for personal email logins, but you can generate a reset password email for them if they forget their password.
-
-
Input details about your classroom section
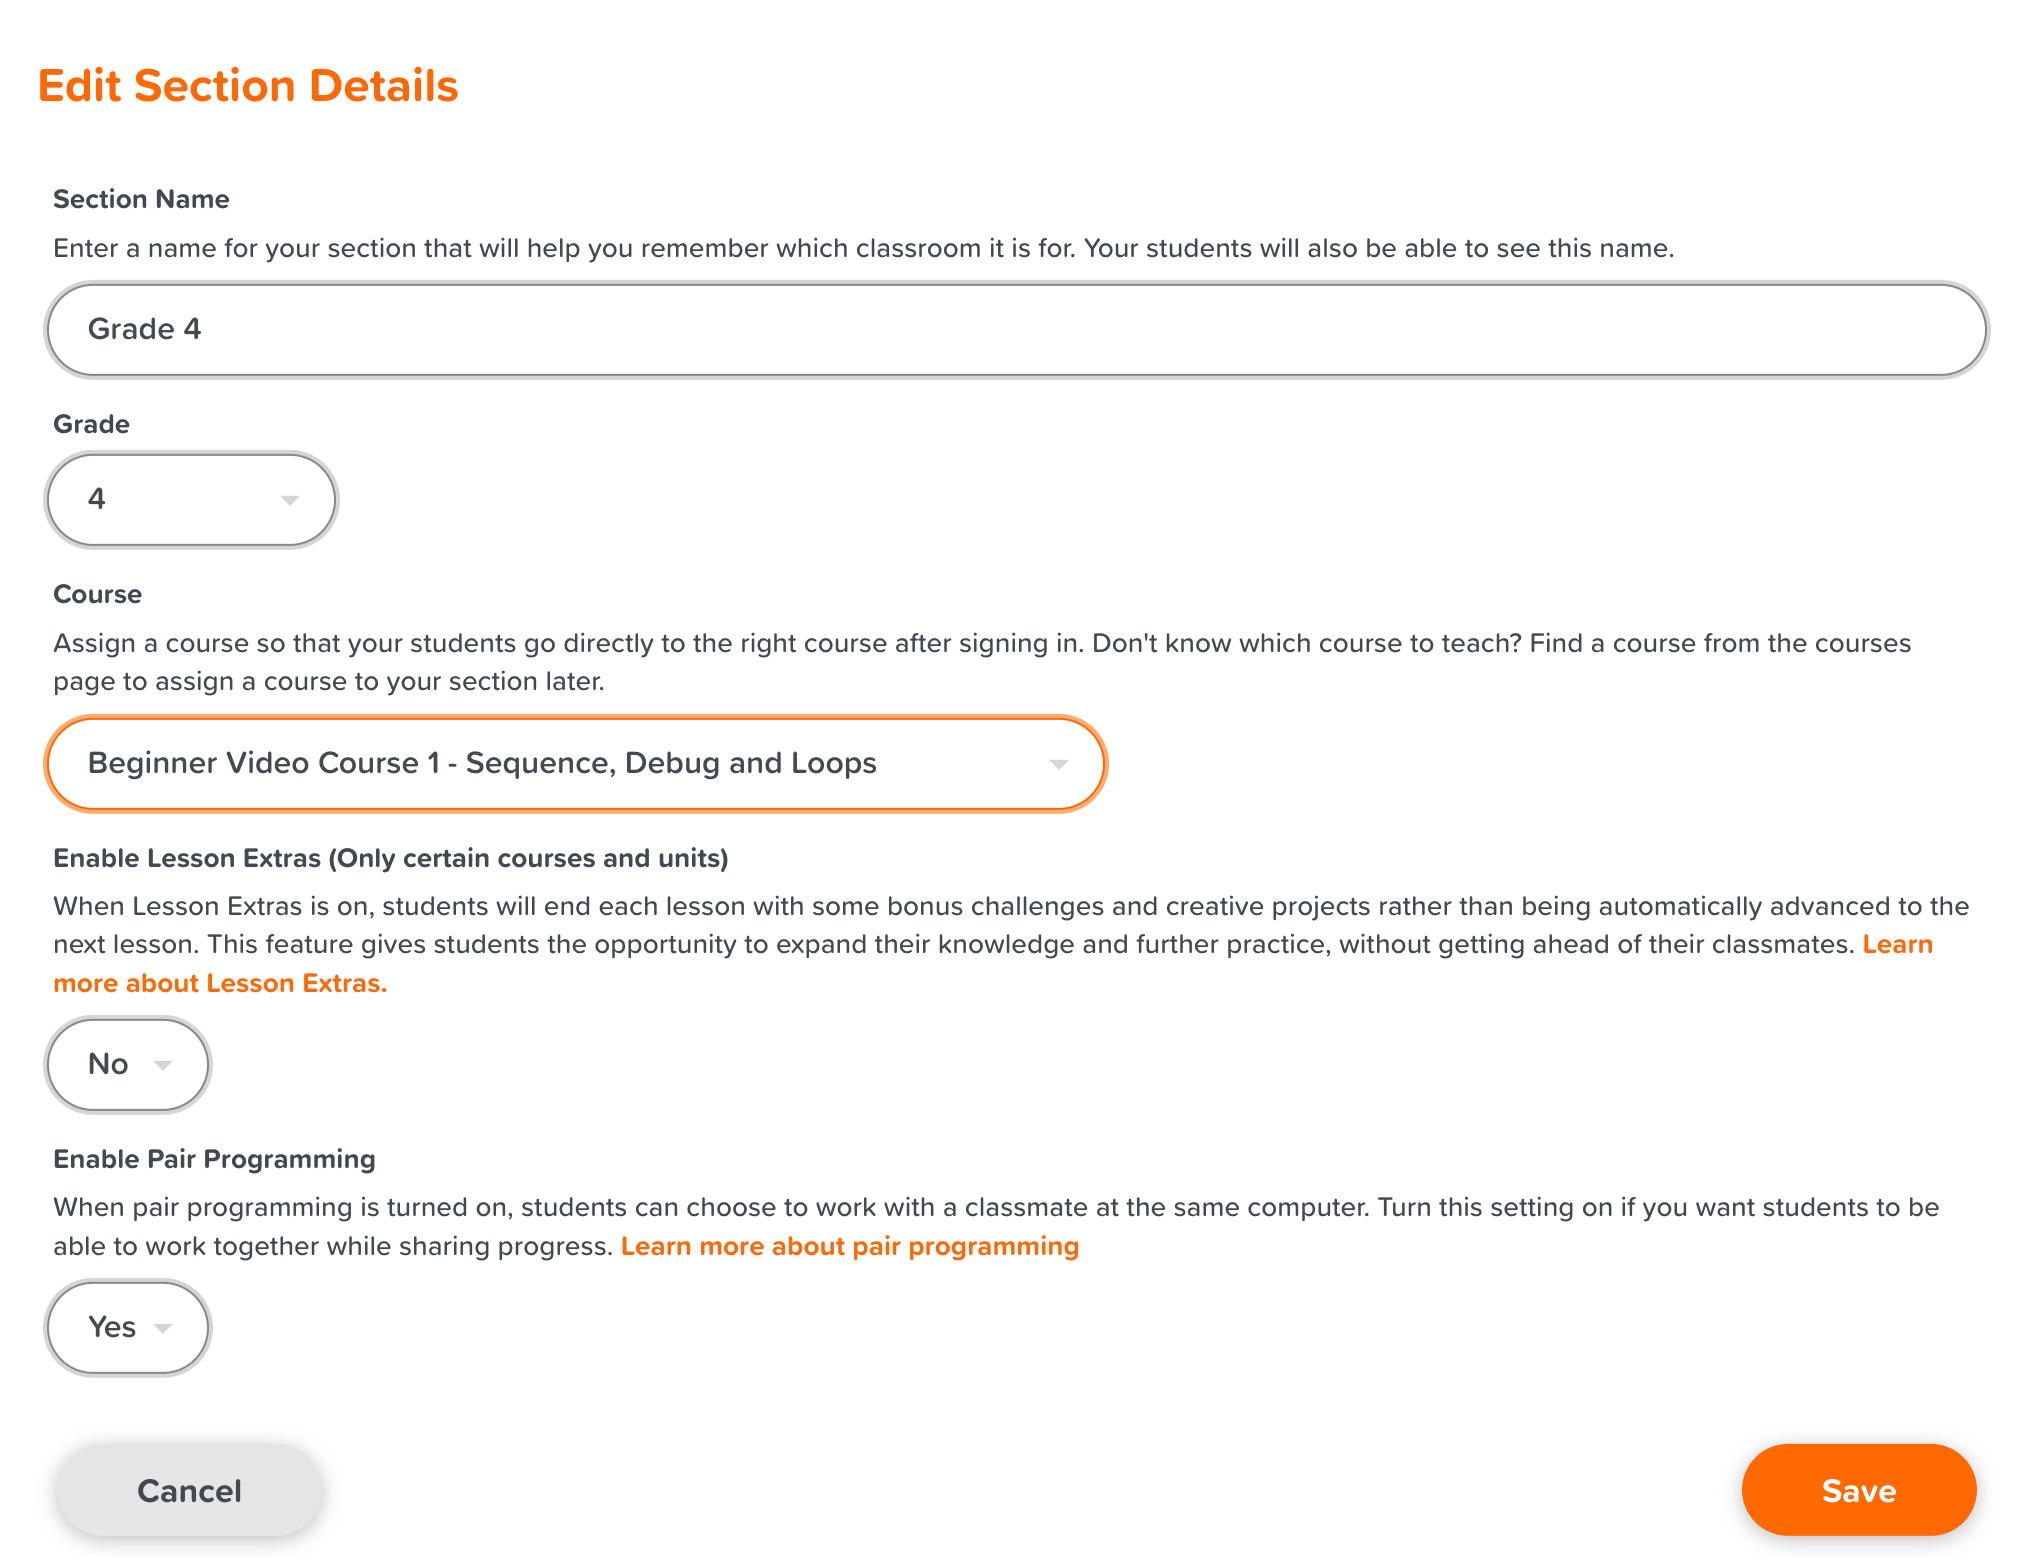
Once you pick the login type for your students, you will be able to finish filling out your section settings in a dialog that looks like this:
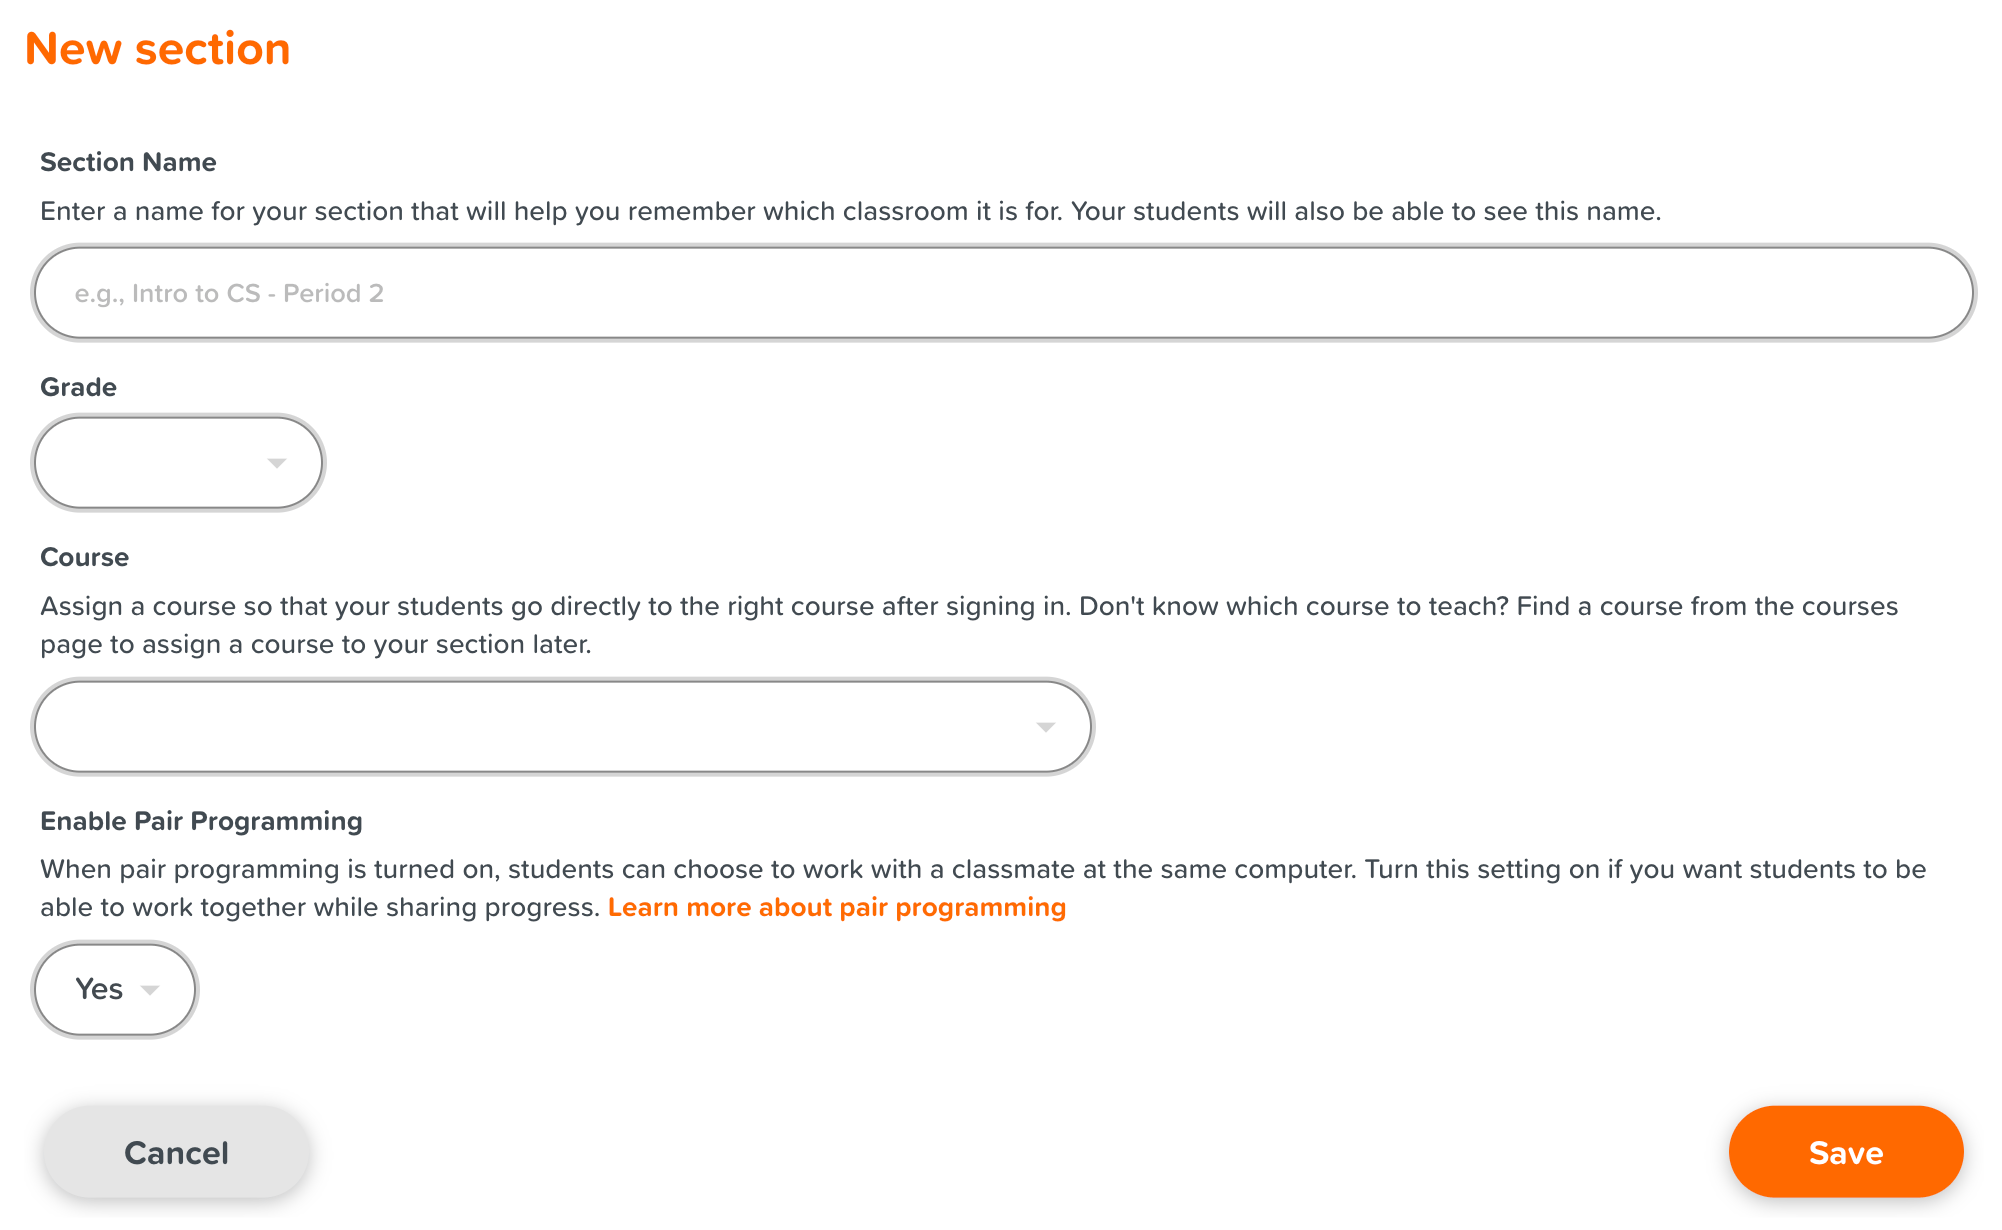
Fill out the section details with the following information:
-
Section Name
Enter a name for your classroom section that will help you remember what the section is for. Since your students can also see the name, we recommend naming it something that can be easily recognized.
-
Grade
Choose which grade you are teaching. Pick "Other" if you are teaching a mix of grades, or grades other than K12. This setting is solely for your reference, and it won't affect your students' experience or which courses they can access.
-
Course
Choose the course you are teaching for the section. Your students will automatically be taken to the page of the given course when they log in. If you have not decided what course to teach, simply choose "Decide later" in the course dropdown for now.
-
Enable Pair programming
Pair programming is a collaborative learning method in which students program in pairs instead of individually. When pair programming is turned on for your classroom section, students can choose to work with other student(s), in tandem, at one computer while completing regular programming assignments. Students who pair programs together will share progress. Learn more about pair programming here.
-
-
Save your section
Once you finished filling out all of the section details, click the "Save" button in the dialog to save. And the newly created section will be displayed under the 'Classroom Sections' header on your dashboard page.
-
-
Assign Course to Your Section
Once you've chosen a video course from the Series of Video Courses Page, you can assign it to your section of students. Assigning a course to a section and keeping that assignment up-to-date as the class progresses is helpful for two reasons:
-
It ensures that your students will start in the right place when they sign in. Students in a section will always start in the course they were assigned to when they sign in. Only one course can be assigned to a section at a time, but students can continue to access any other course at any time by visiting their Dashboard Page.
-
It makes it easier for you to view a section's most recent progress in the Teacher Dashboard Page. When you view progress for a section in the Teacher Dashboard Page, each section will default to the course they are currently assigned to. You can always change the course you're viewing progress for at any time using the course dropdown list.
You can change which course a section of students is assigned to in three different places:
-
Updating section assignment from your Dashboard Page.
This option is recommended if you need to update many sections to different courses at the same time.
-
From your list of sections on the Teacher Dashboard Page, click the down-facing arrow on the far right of each section.
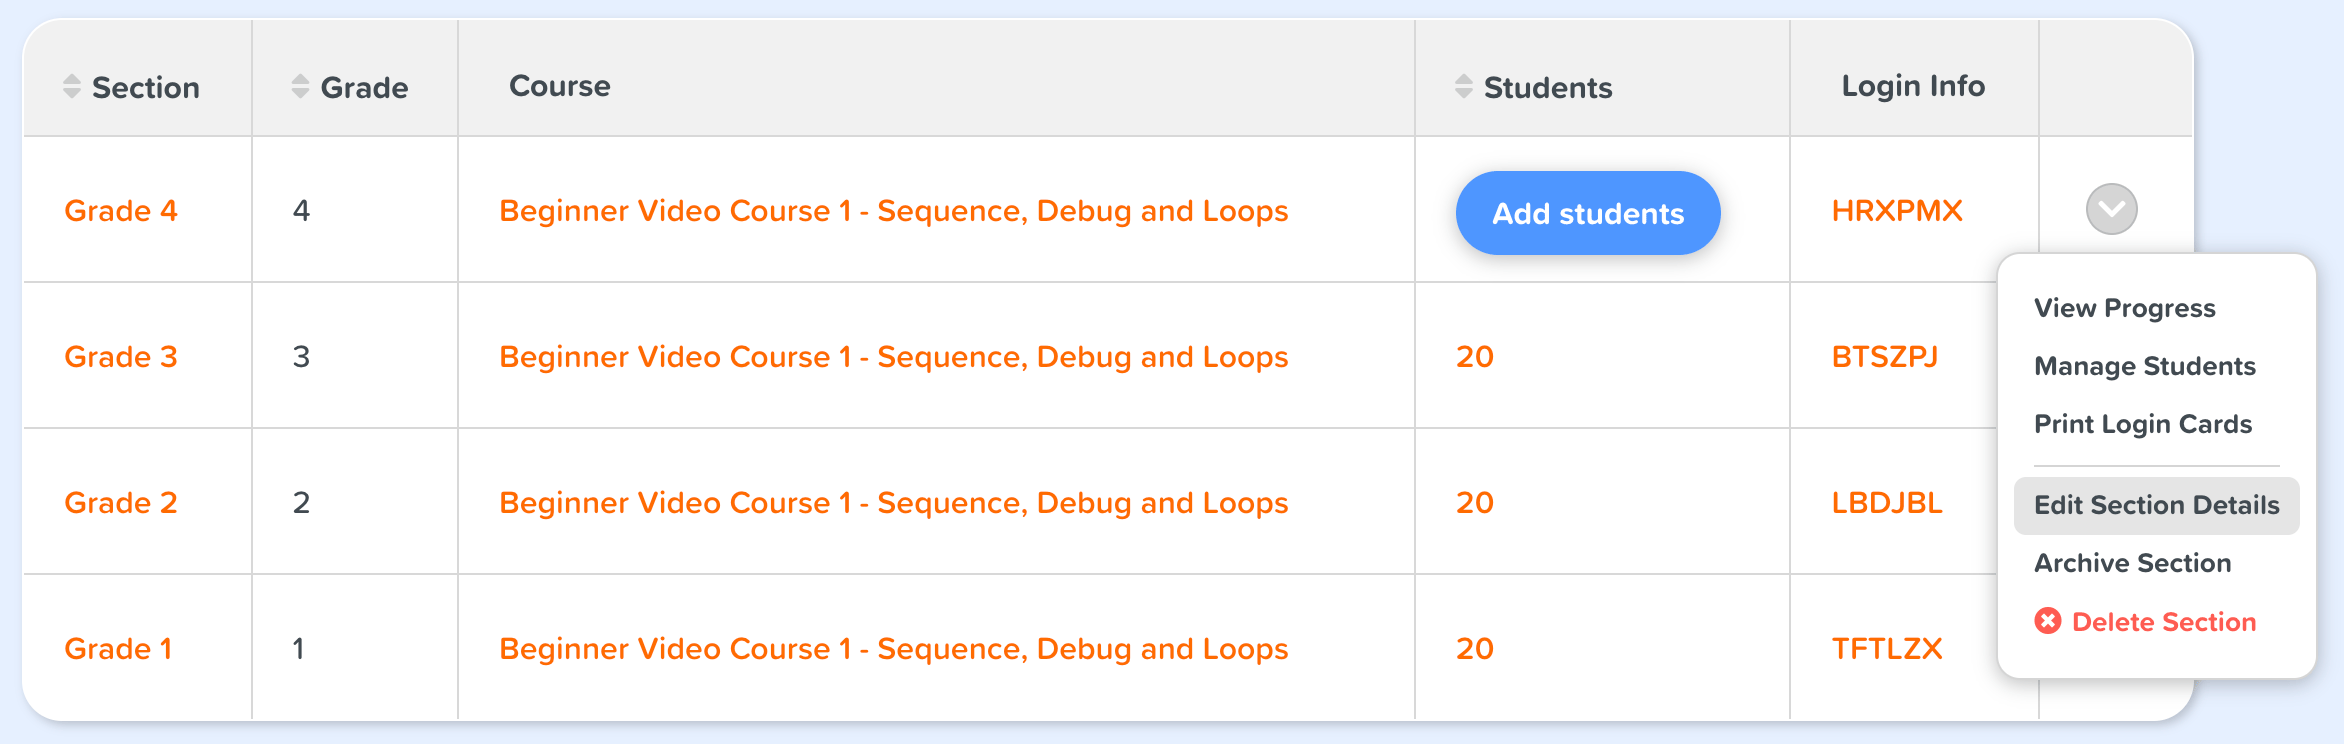
-
Click the 'Edit section details' option. This will open a new window where you can edit that section's settings and change the assigned course.
-
-
From the course page you want to assign to your section.
This option is recommended if you need to update many sections to the same course at the same time.
-
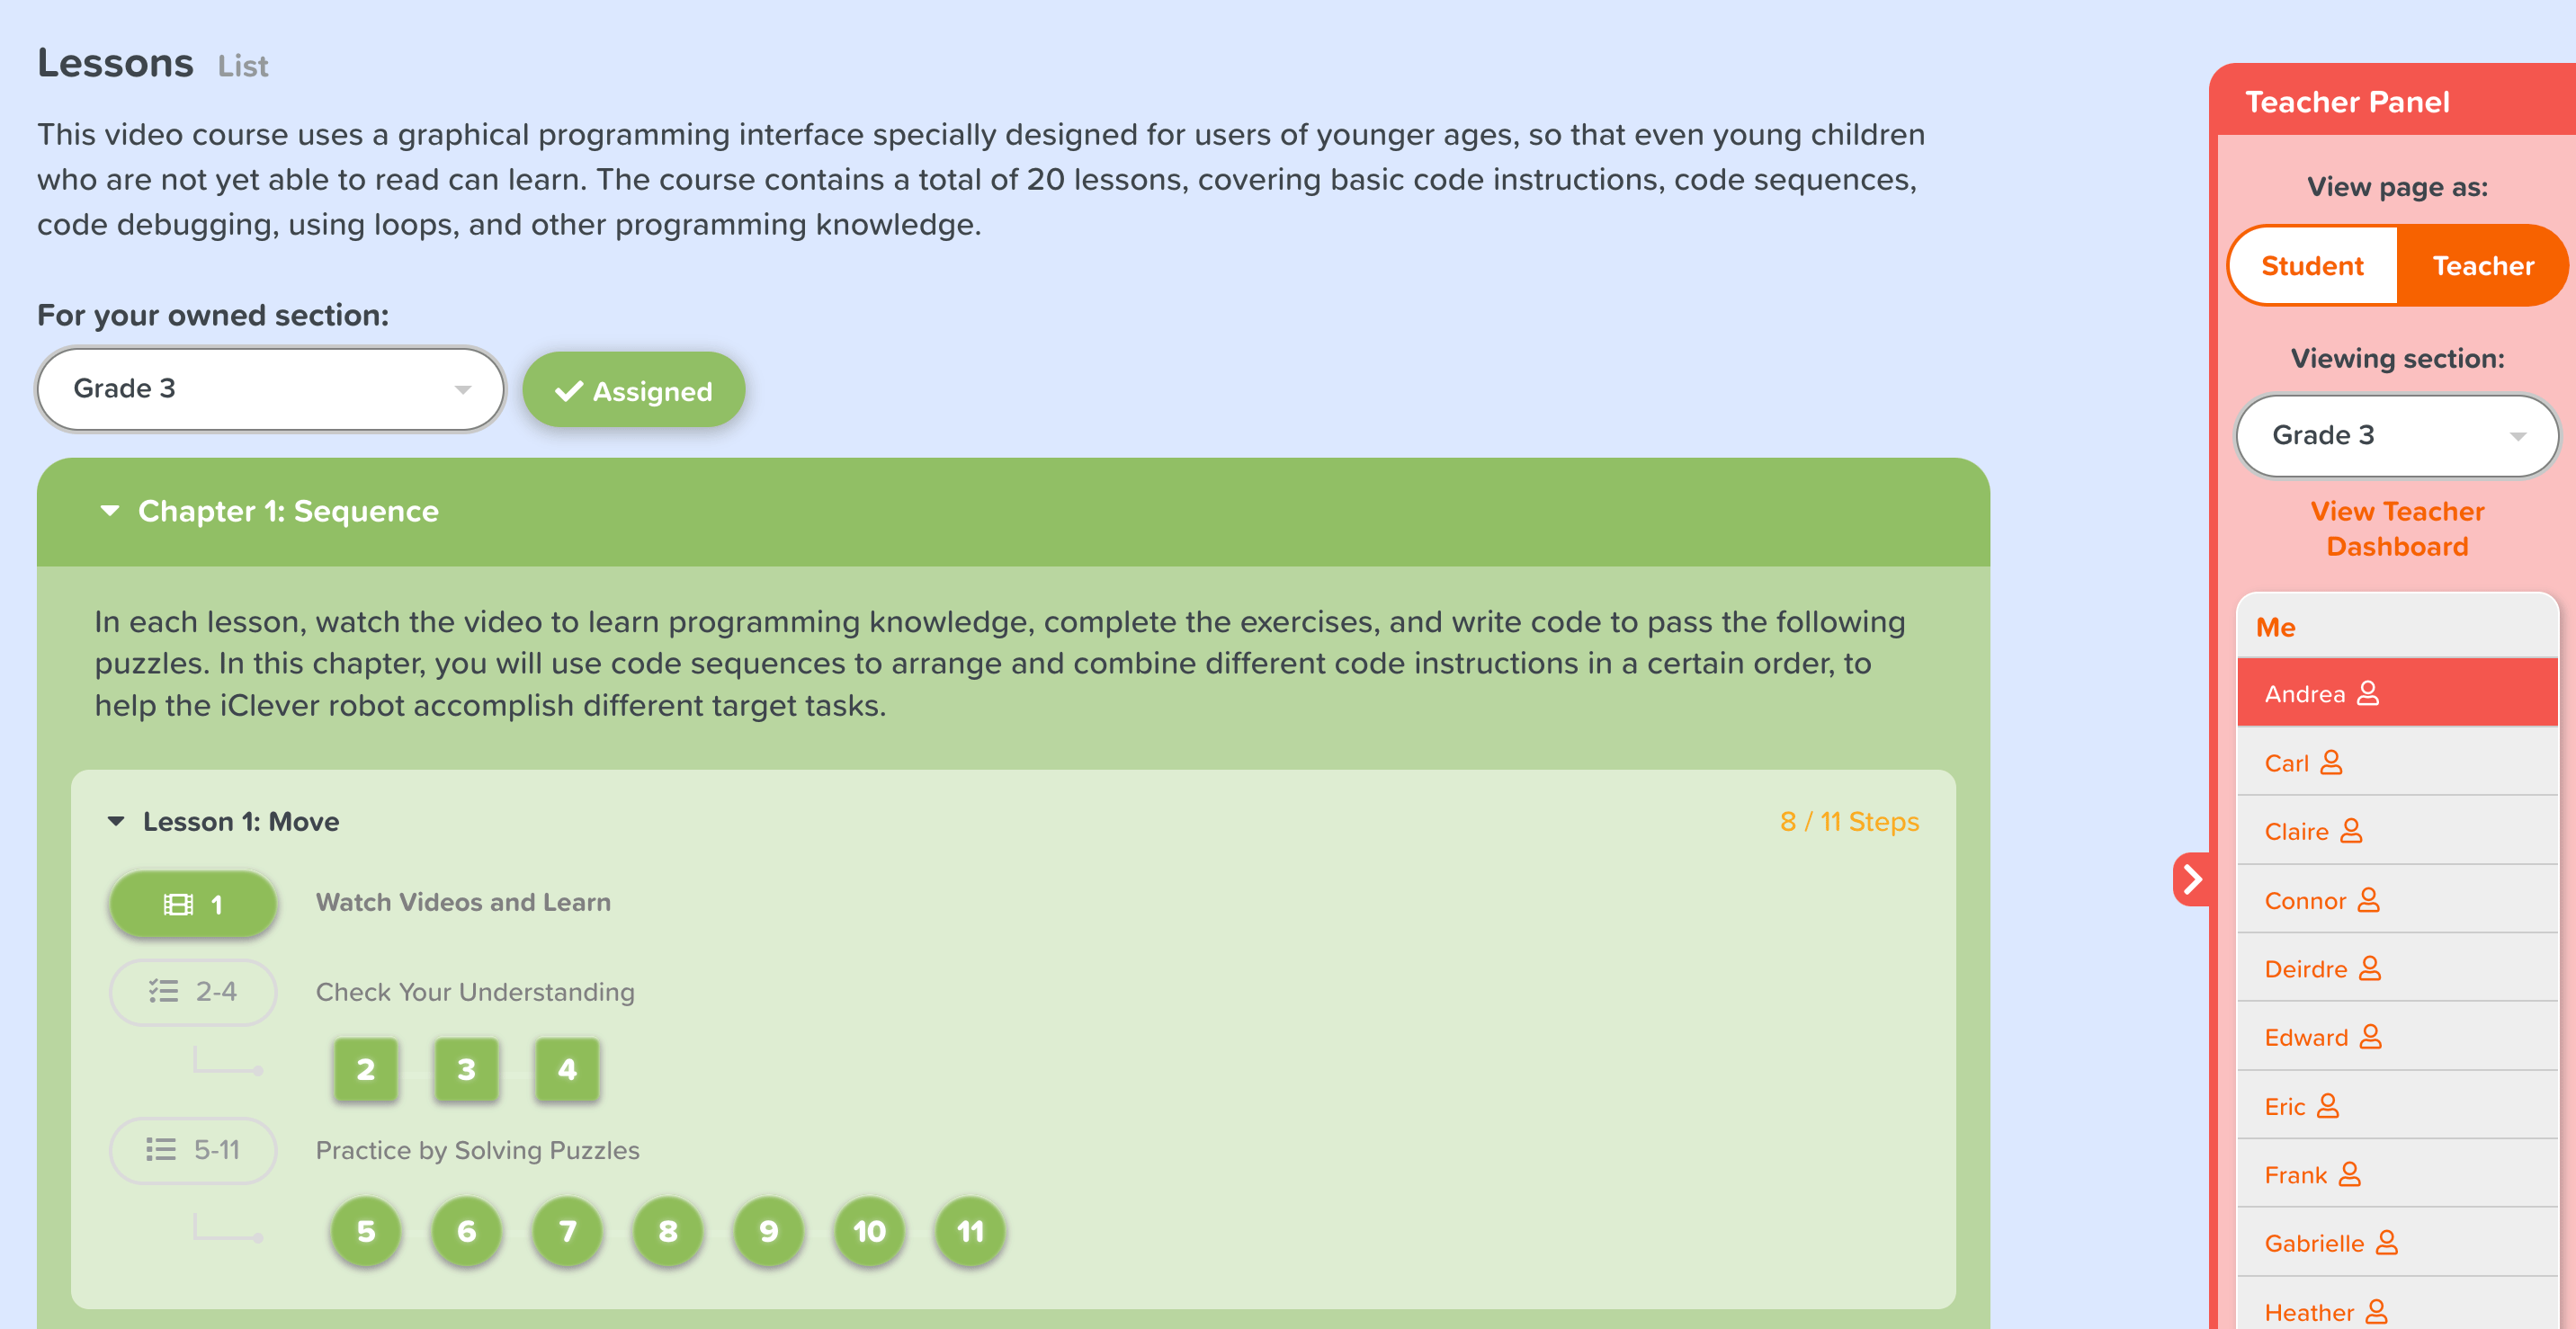
Go to the overview page for the course you want to assign.
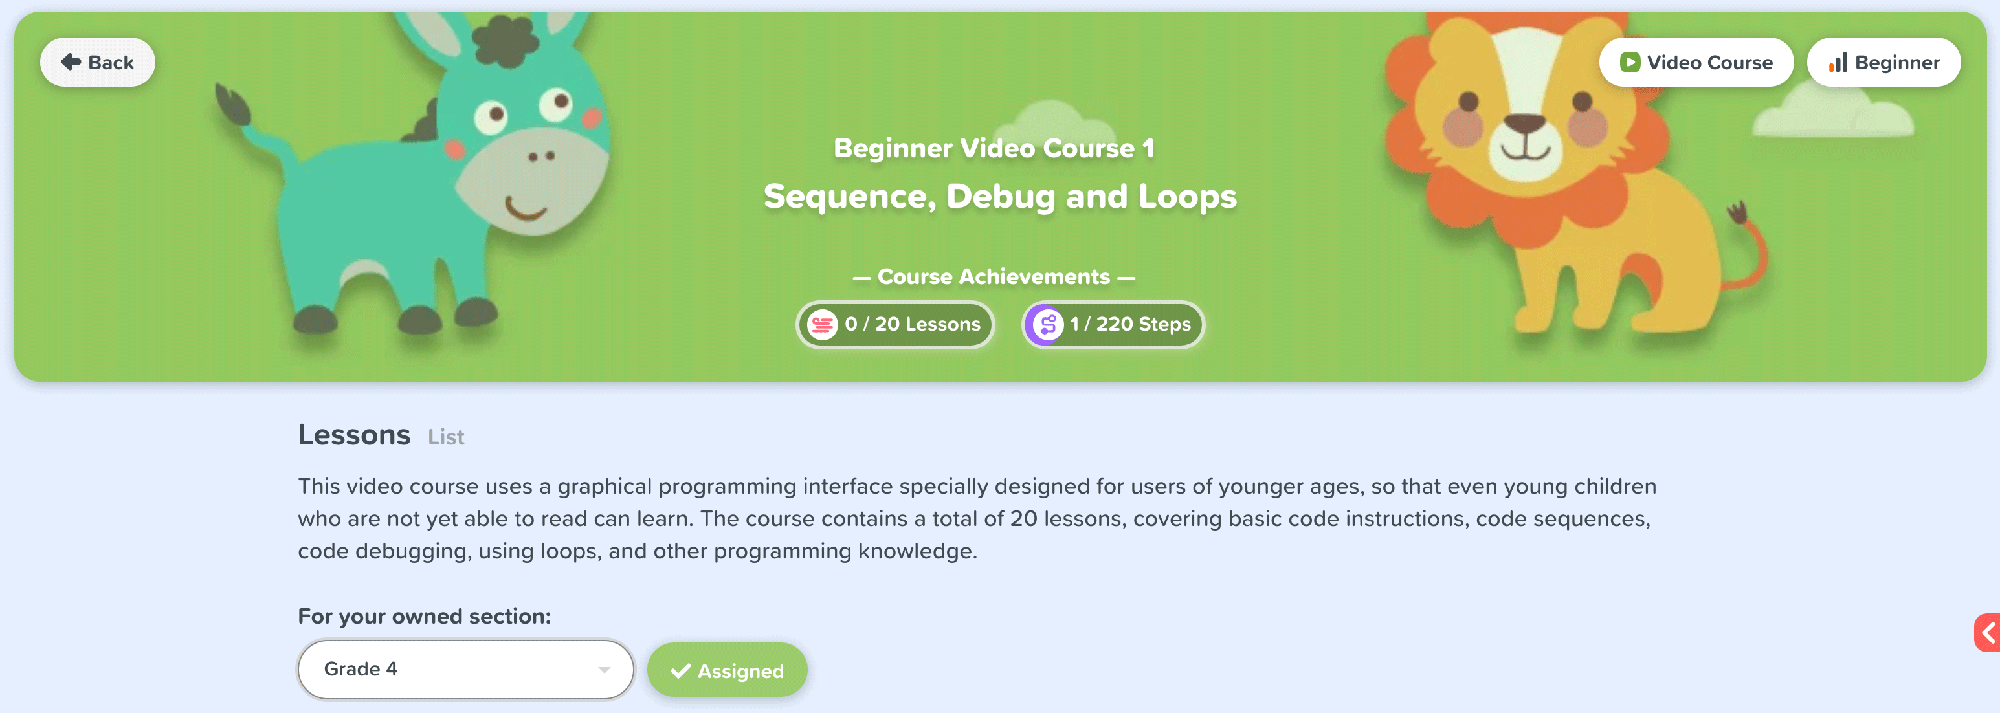
-
Select the section you want to assign the course to from the Current Section dropdown list at the top of the page.
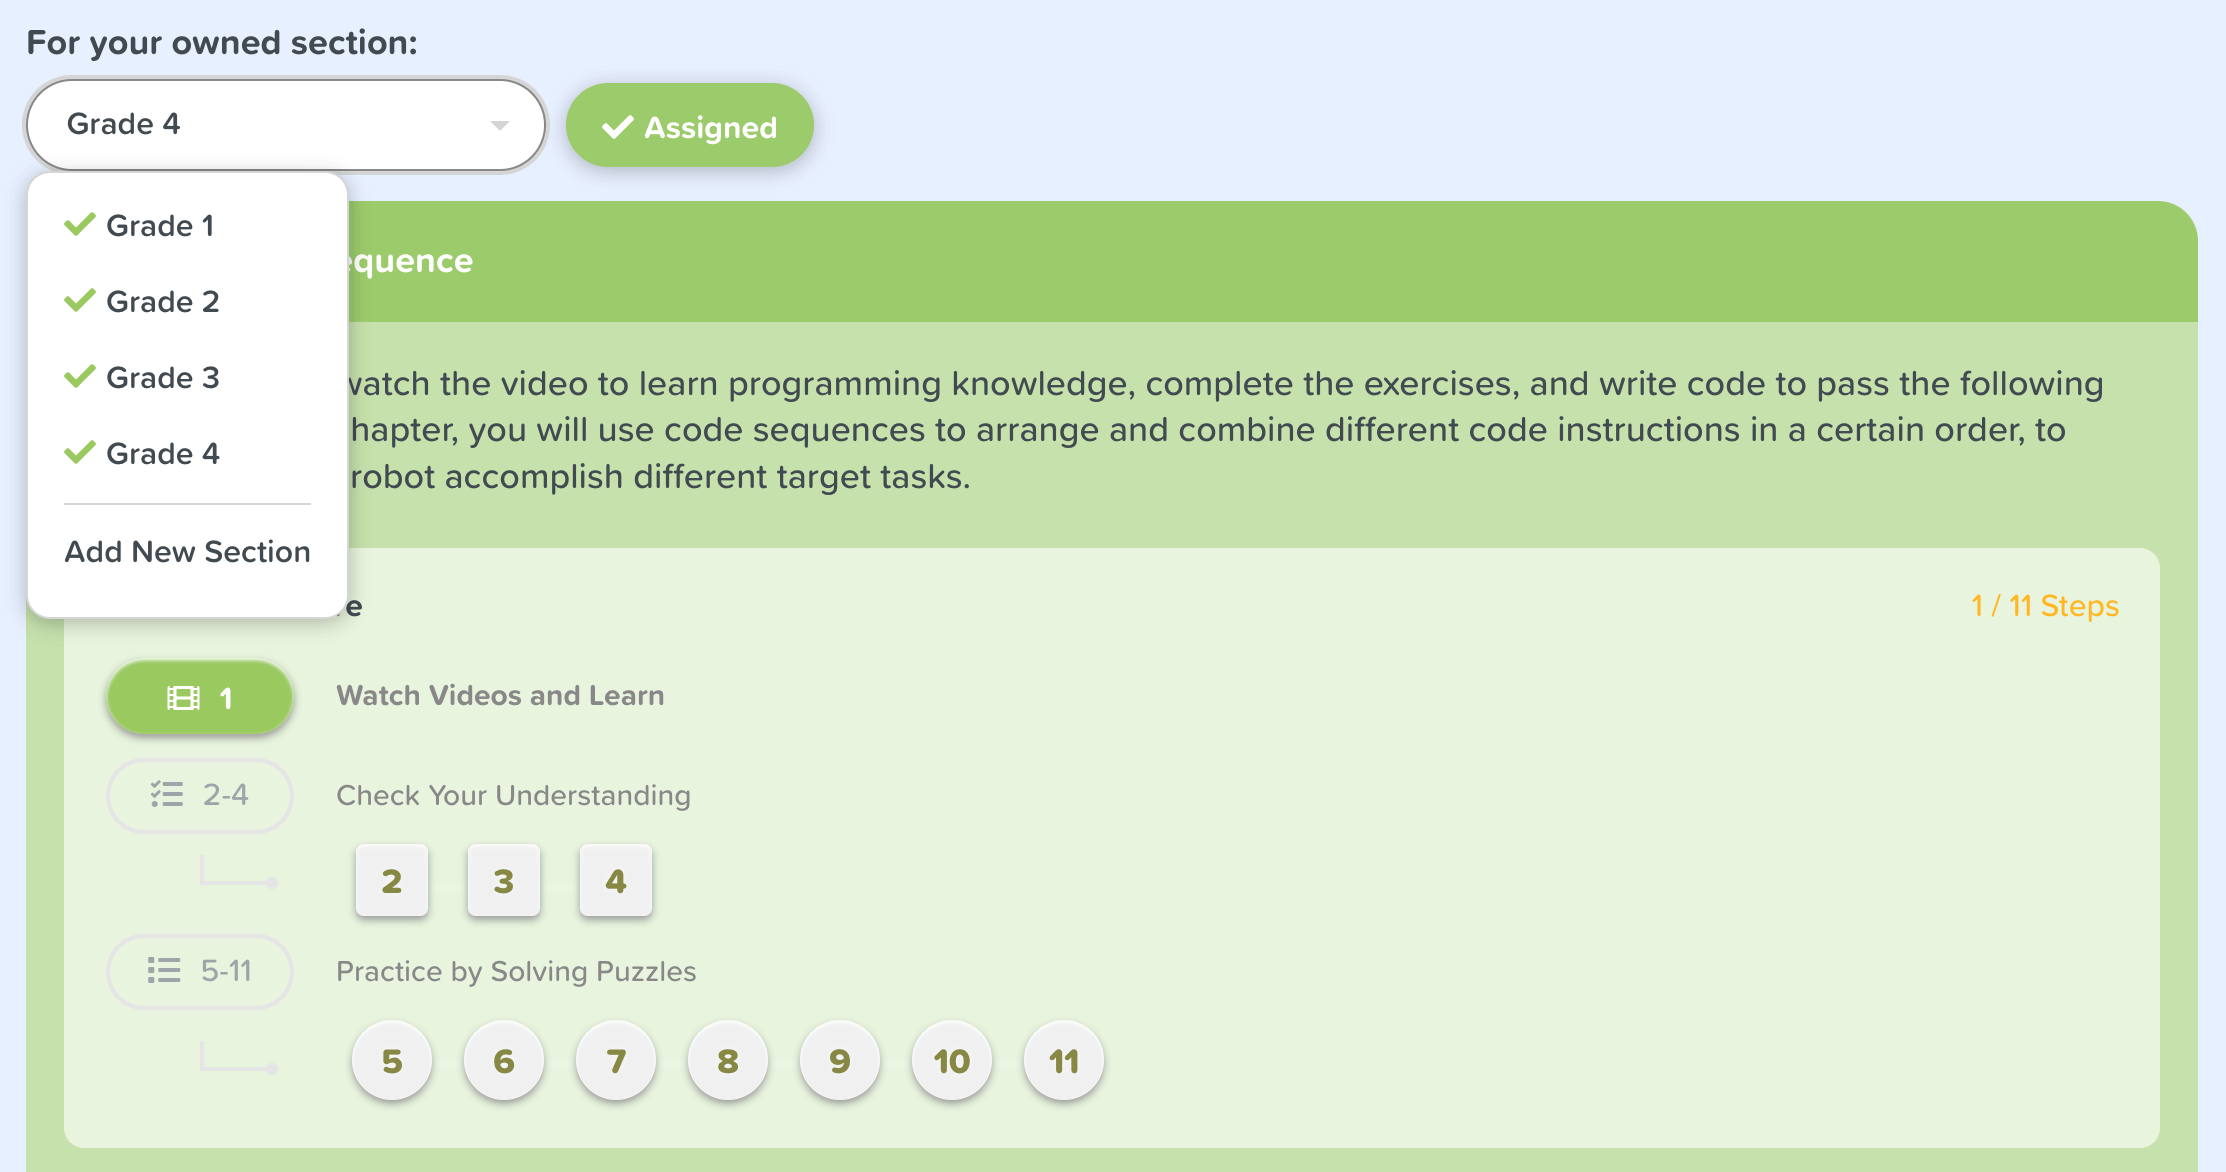
Note: any sections in the dropdown list with a green checkmark next to them are already assigned to that course.
-
Click the "Assign to section" button to assign the current section to the course you're viewing. The "Assign to section" button should turn to "Assigned" when it has been successfully assigned to the section.

-
If you want to quickly undo the assignment you just did, hover over the "Assigned" button until it says "Unassign" and click it to unassign that section from the current course.

Note: you don't need to unassign a section from a course before assigning that section to a new course.
-
-
-
Add Students to Your Section
Once you've created a section and assigned course, you'll want to add students to it. The steps to do this will differ based on the login type of the section you chose.
-
For sections with login type of Picture Password or Secret Word, you need to manually add students to the sections before they can start coding.
From your Dashboard Page, find your newly created section under the "Classroom Sections" header and click the "Add students" button in the "Students" column.
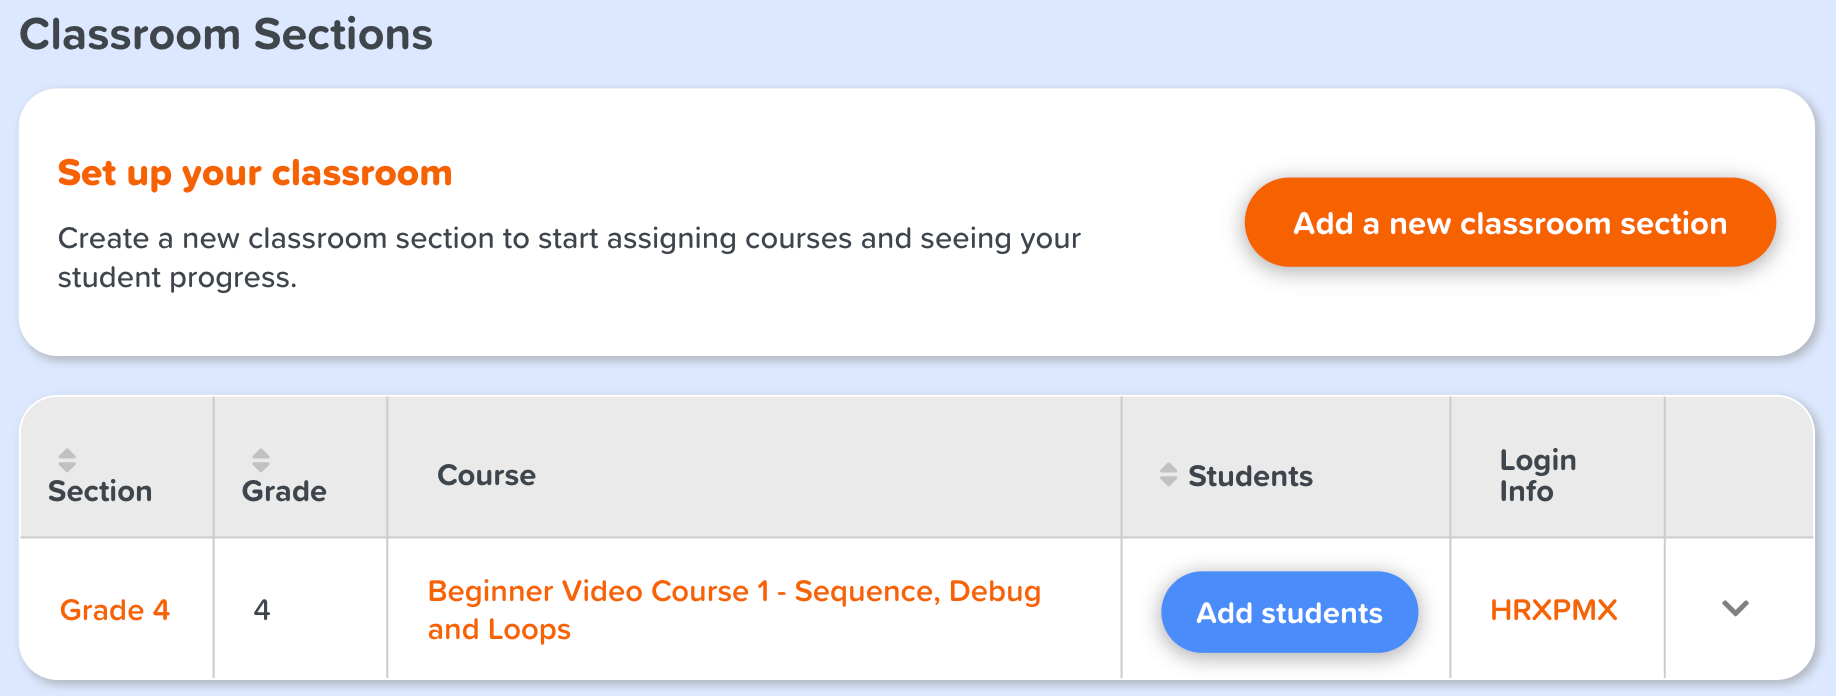
It will take you to the Manage Students tab of the section.
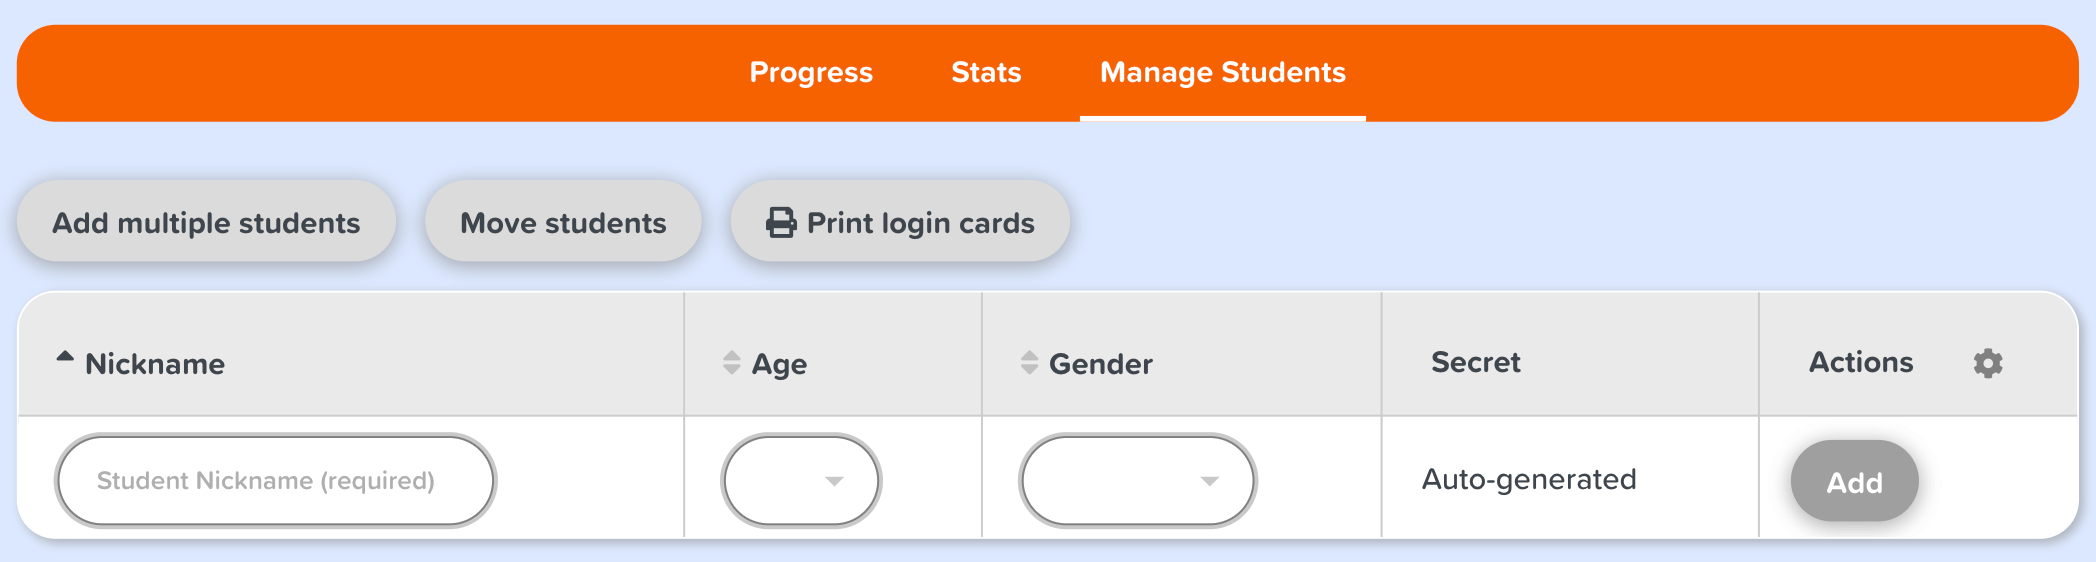
The Manage Students tab is the place where you can:
-
See and edit the list of students in the classroom section.
-
Reset passwords for your students.
-
Find instructions and supporting resources for getting students signed in to the section.
You can fill out the top input row of the student table and click the "Add" button to add a student to the section.
Or, you can add multiple students to the section at a time by:
-
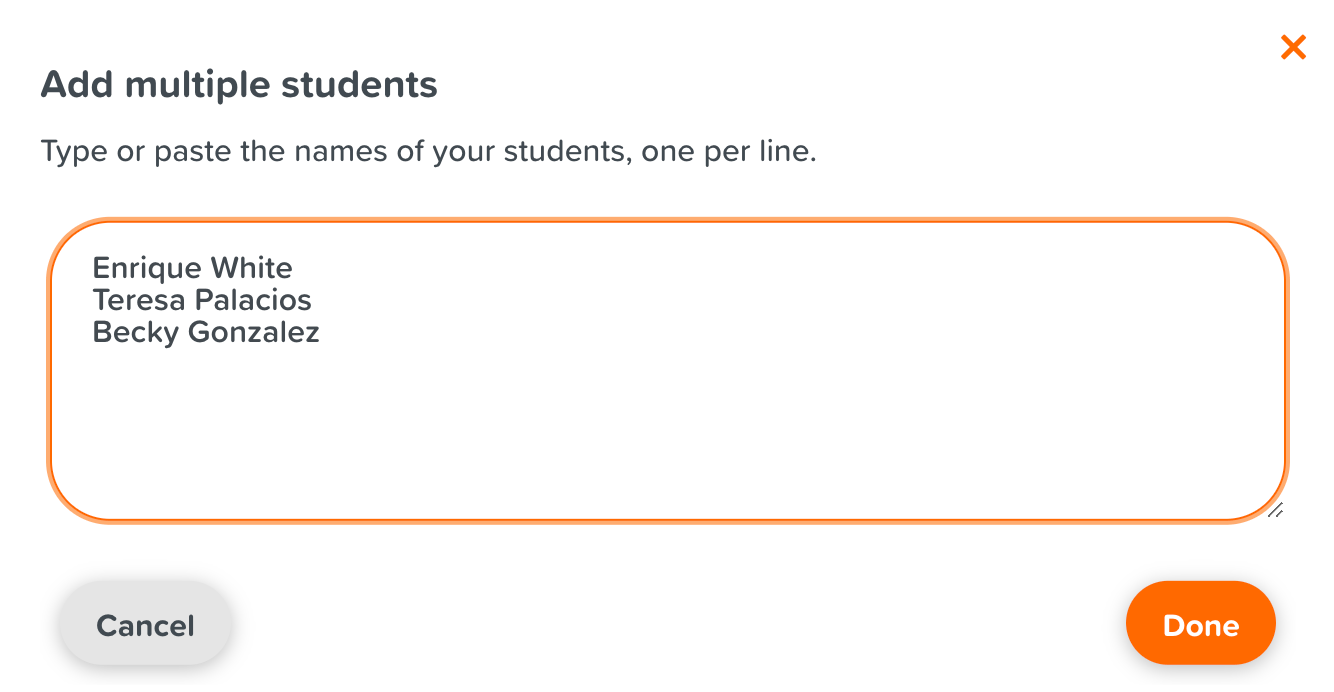
Clicking the "Add multiple students" button at the top of the student table.
-
Type or copy-and-paste student names into the dialog that appears, one per row, and click the "Done" button.
-
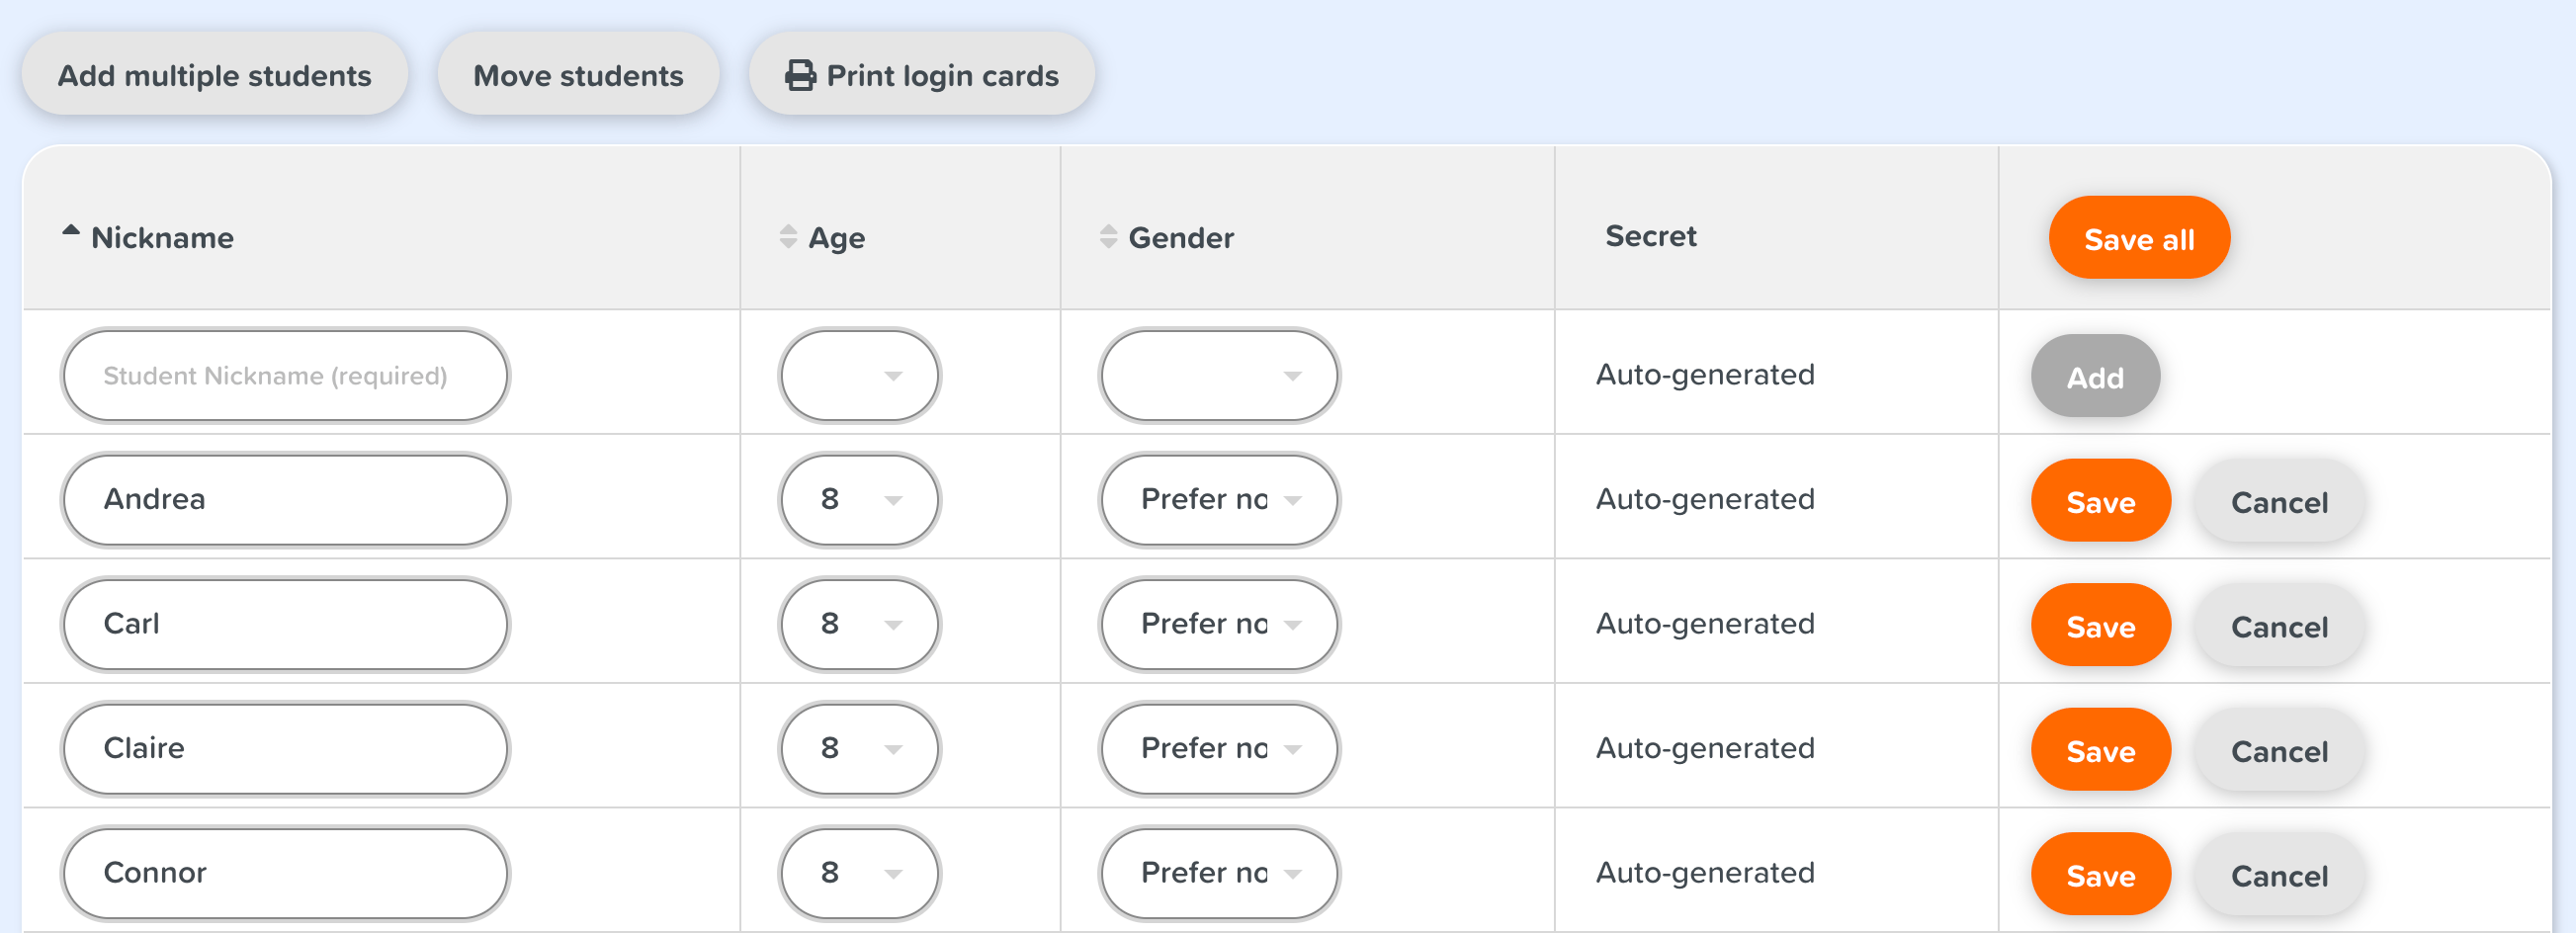
Fill in the gender and age setting of the students in the table and then press the 'Save All' button to add all of those students to the section. The age you enter for your students may affect what type of course resources they can access.
-
All of these students will now have an auto-generated password (either a pair of Secret Words or a Picture Password) and a username assigned to them. You can tap the "Show secret" button to see the password. Made a typo or any other change? You can edit a student's entry in the table by clicking the down arrow in the "Actions" column for that student.

Tips:
-
Student usernames are what students use to sign in. They are automatically generated using the student names you provide when adding students. They cannot be changed, except by deleting the student account and creating a new one. So double-check for typos in the names when adding students!
-
Nicknames are commonly used to identify students across the website and can be changed by both teachers (on the Manage Students tab) and students (on their Account Settings page).
-
When initially naming your students, we recommend using only the first names OR first names plus only a portion of the last names (EX: the first initial of the last name) when it's necessary to distinguish between two students with the same first names. This will help keep the usernames of your students less personally identifiable.
-
We care about student privacy and out of an abundance of caution. We do not currently offer a separate last name field for students.
-
-
For sections with login type of Personal Email, you'll want to have students join the section with their own personal accounts.
For sections that are using Personal Email accounts, students will manage their own accounts using their personal emails and their own password. The content about how to create an student account and join a teacher's classroom section will be covered in the next part of this manual. You can also refer to the Student Manual for this.
-
-
Have Your Students Sign In And Get Started
Next you will have your students sign in and start to learn. The way to do this will also differ based on the login type of the section you chose.
-
For sections with login type of Picture Password or Secret Word, getting students signed in.
Each student on the Manage Students tab has a username (generated from the nickname you provided) and a password (either a pair of Secret Words or a Picture Password generated automatically). To sign in, students will need three things:
-
The classroom section code OR a direct link to the section's sign-in page
-
Their nickname
-
Their password
Have your students following the steps below each time they want to sign in to iClever Code:
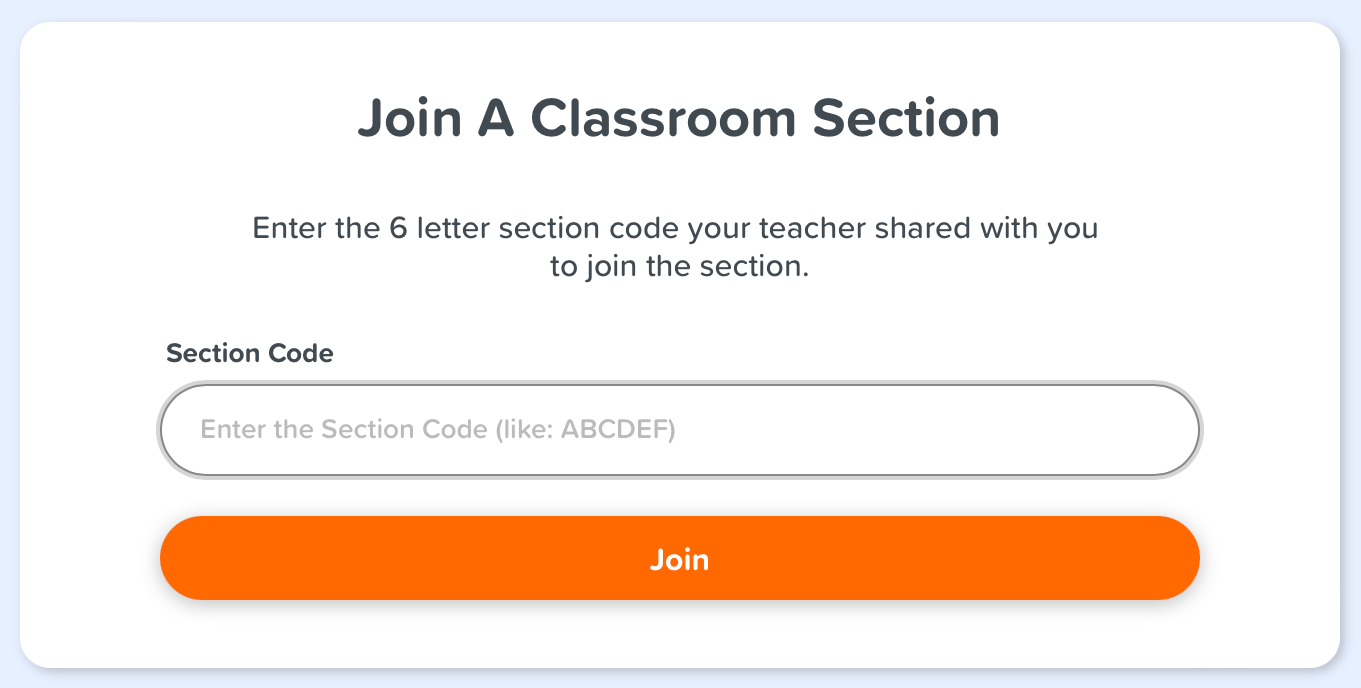
Step 1: Go to the student Join A Classroom Section Page. Enter the section code in the section input box. Then it will take students to the section sign-in page.
-
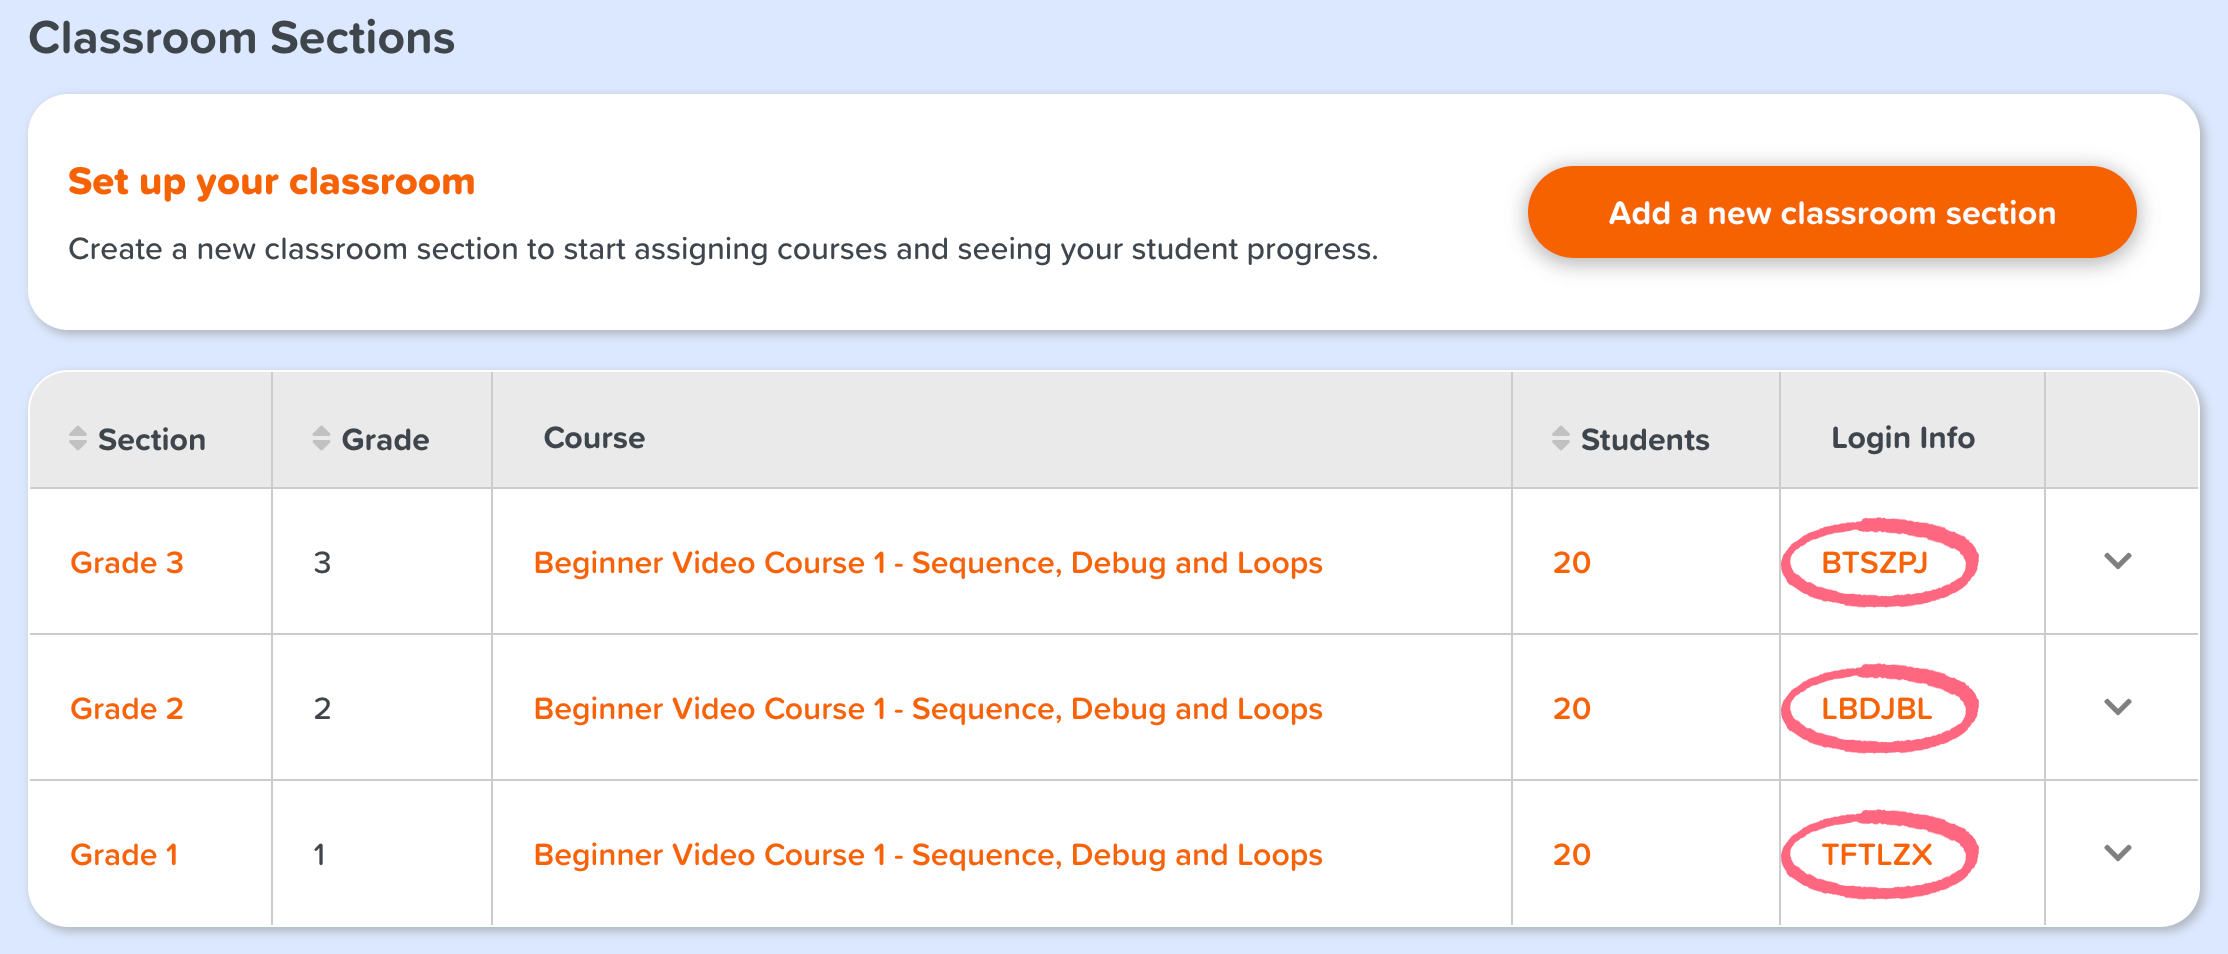
Section codes can be found in the section overview table on the teacher Dashboard Page:
Or in the Section Login Information of the Manage Students tab:

-
The direct link to your section's sign-in page will be different for each section and can be found below the Student Overview table on the Manage Students tab, with the sign-in instructions for each of your sections. You can also recreate the link for your section by taking the example URL and replacing the original section code with your actual one.
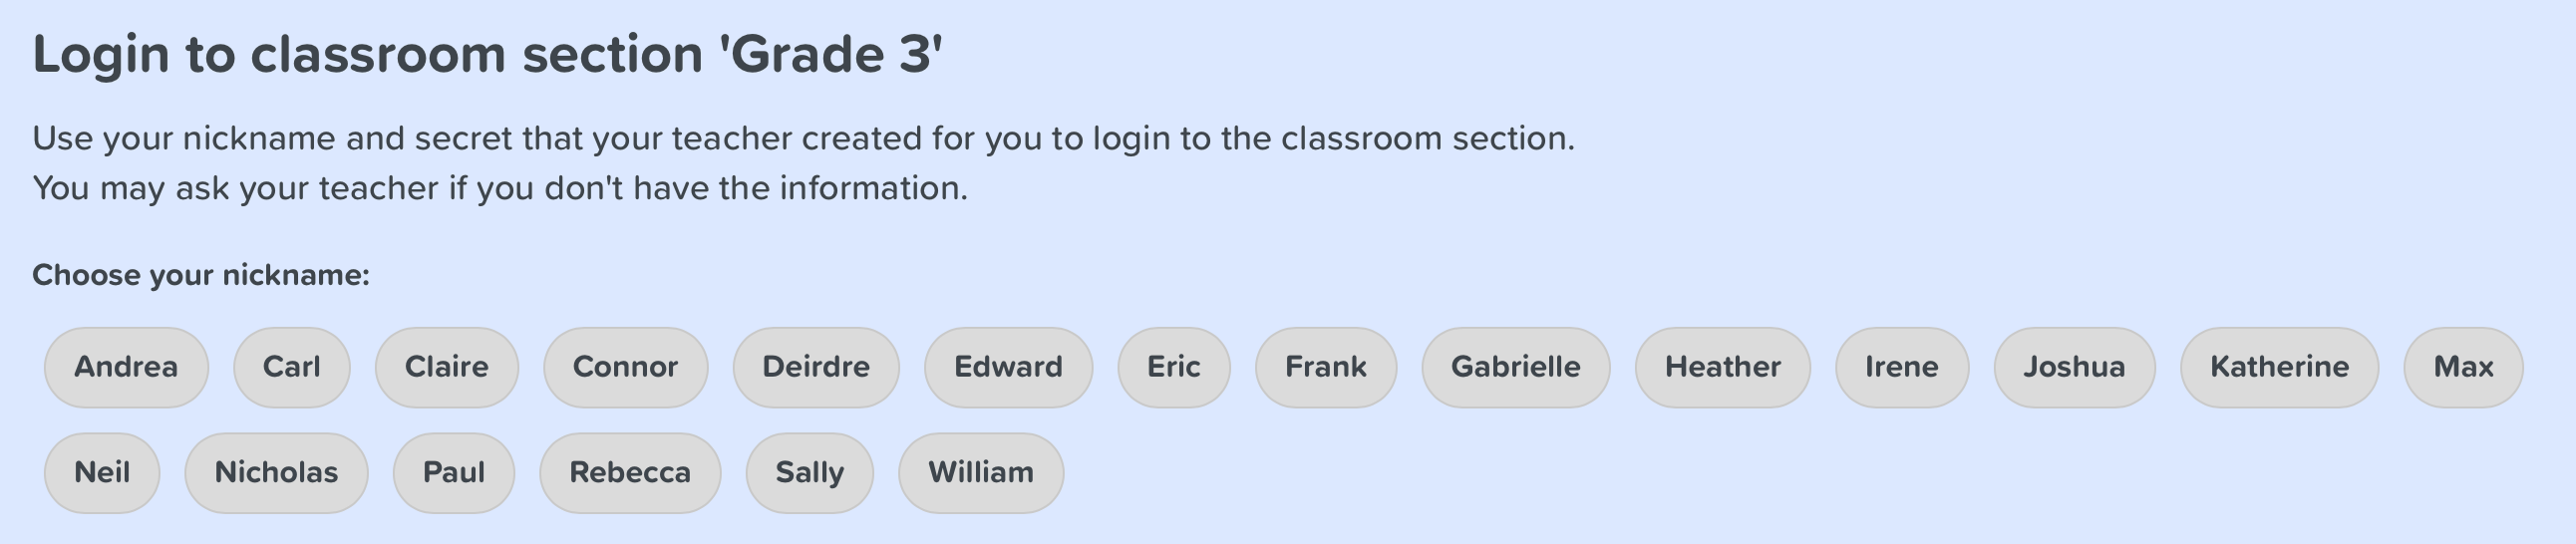
Step 2: Find and click their nickname in the list of students.
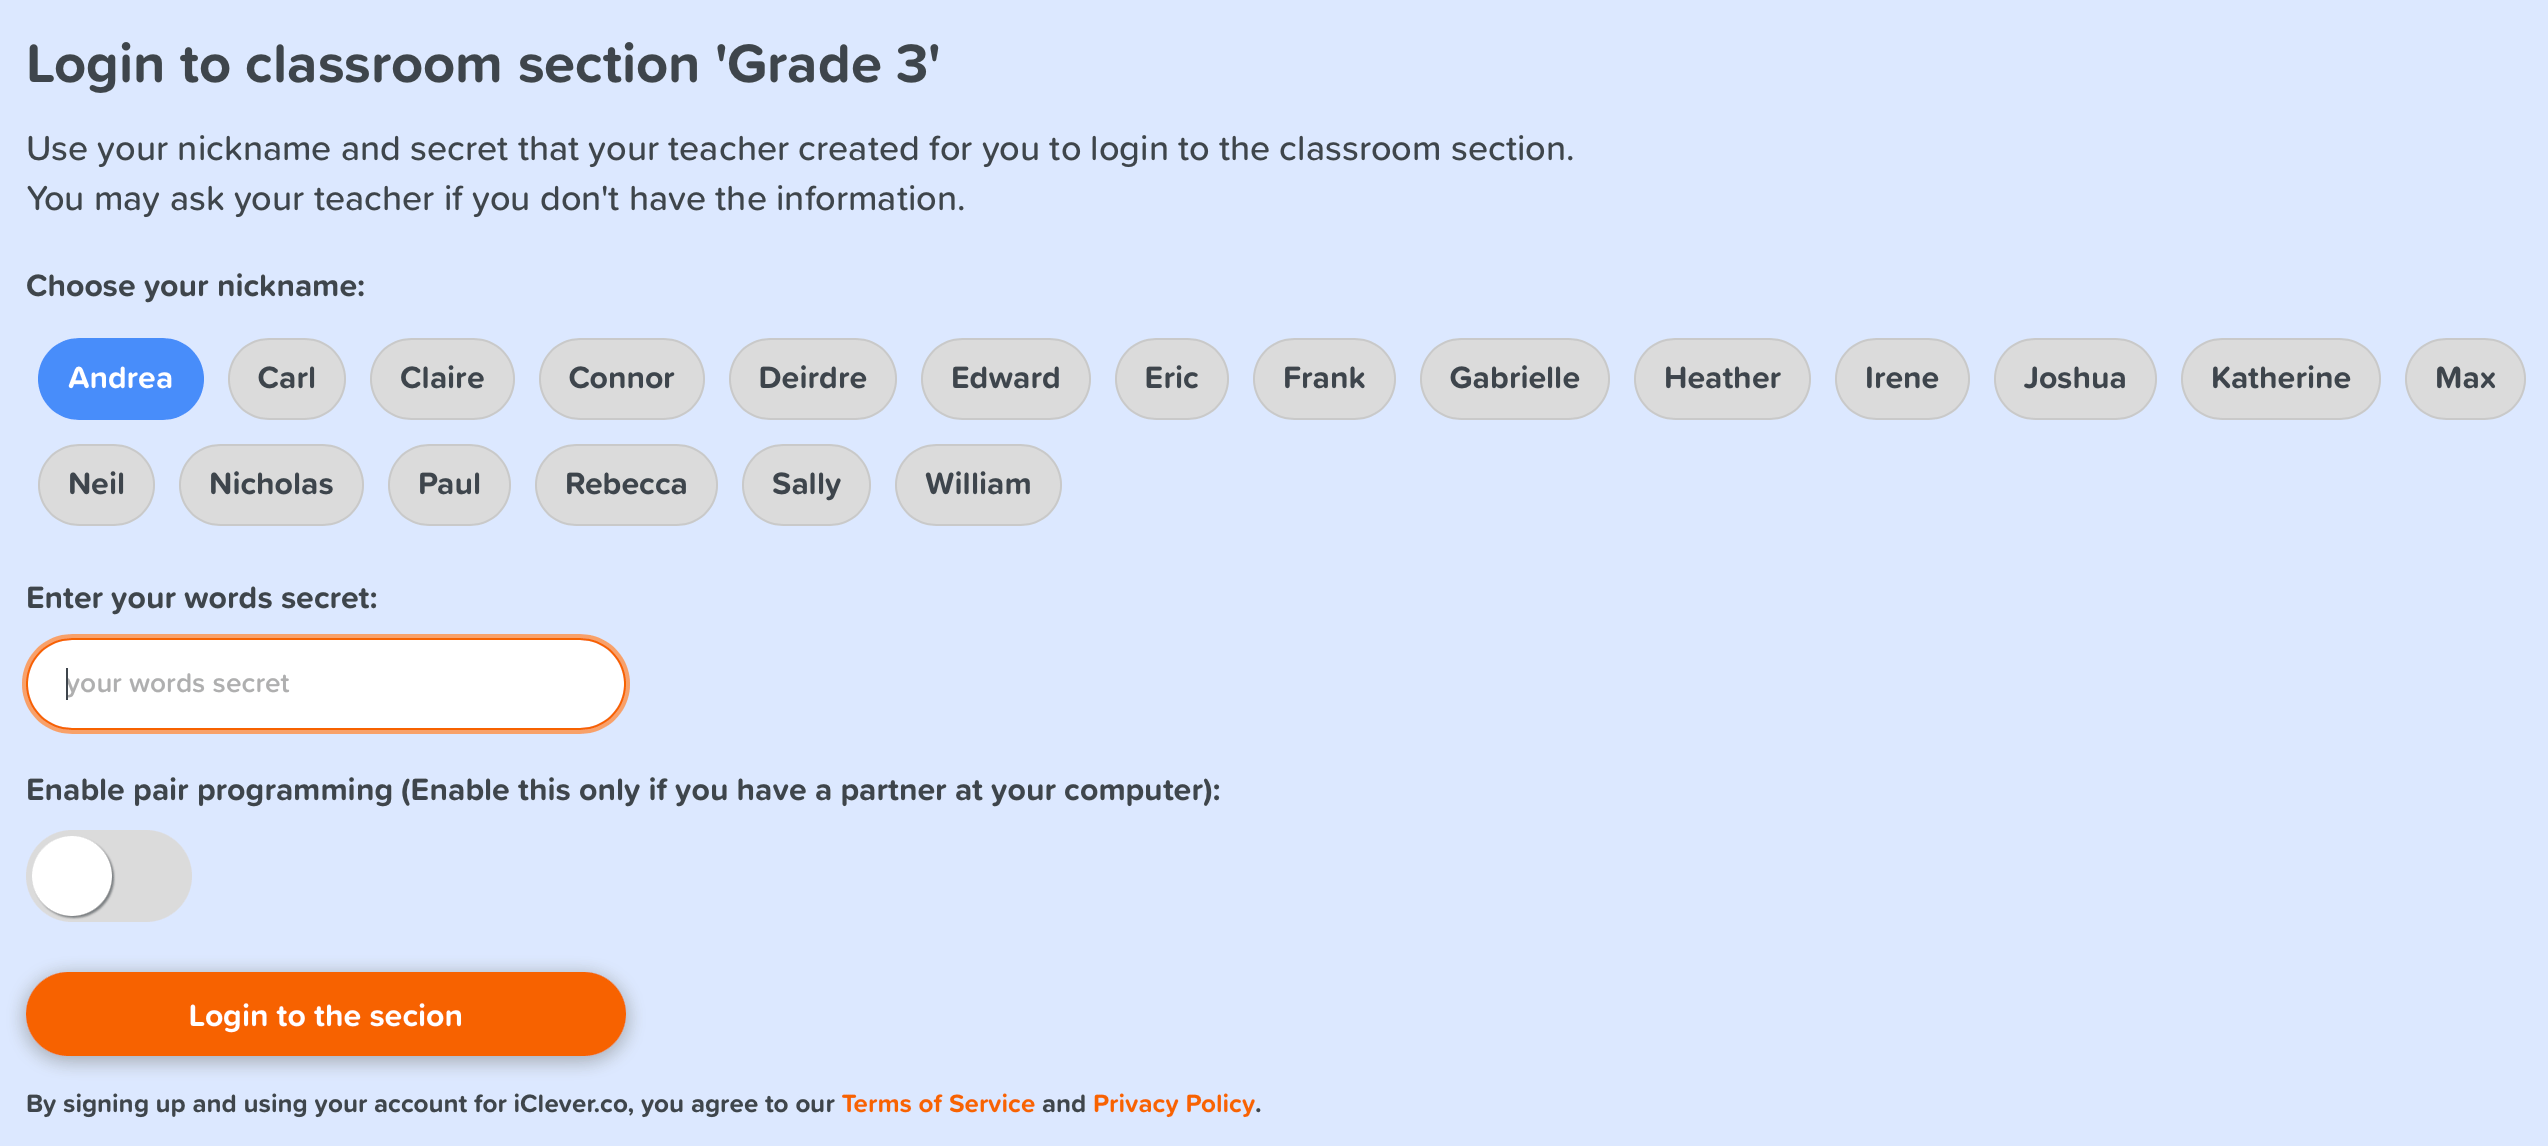
Step 3: Type in their secret words OR tap their picture password from the list of pictures, and click the "sign in" button.
How can I easily get this sign-in information and instructions to my students?
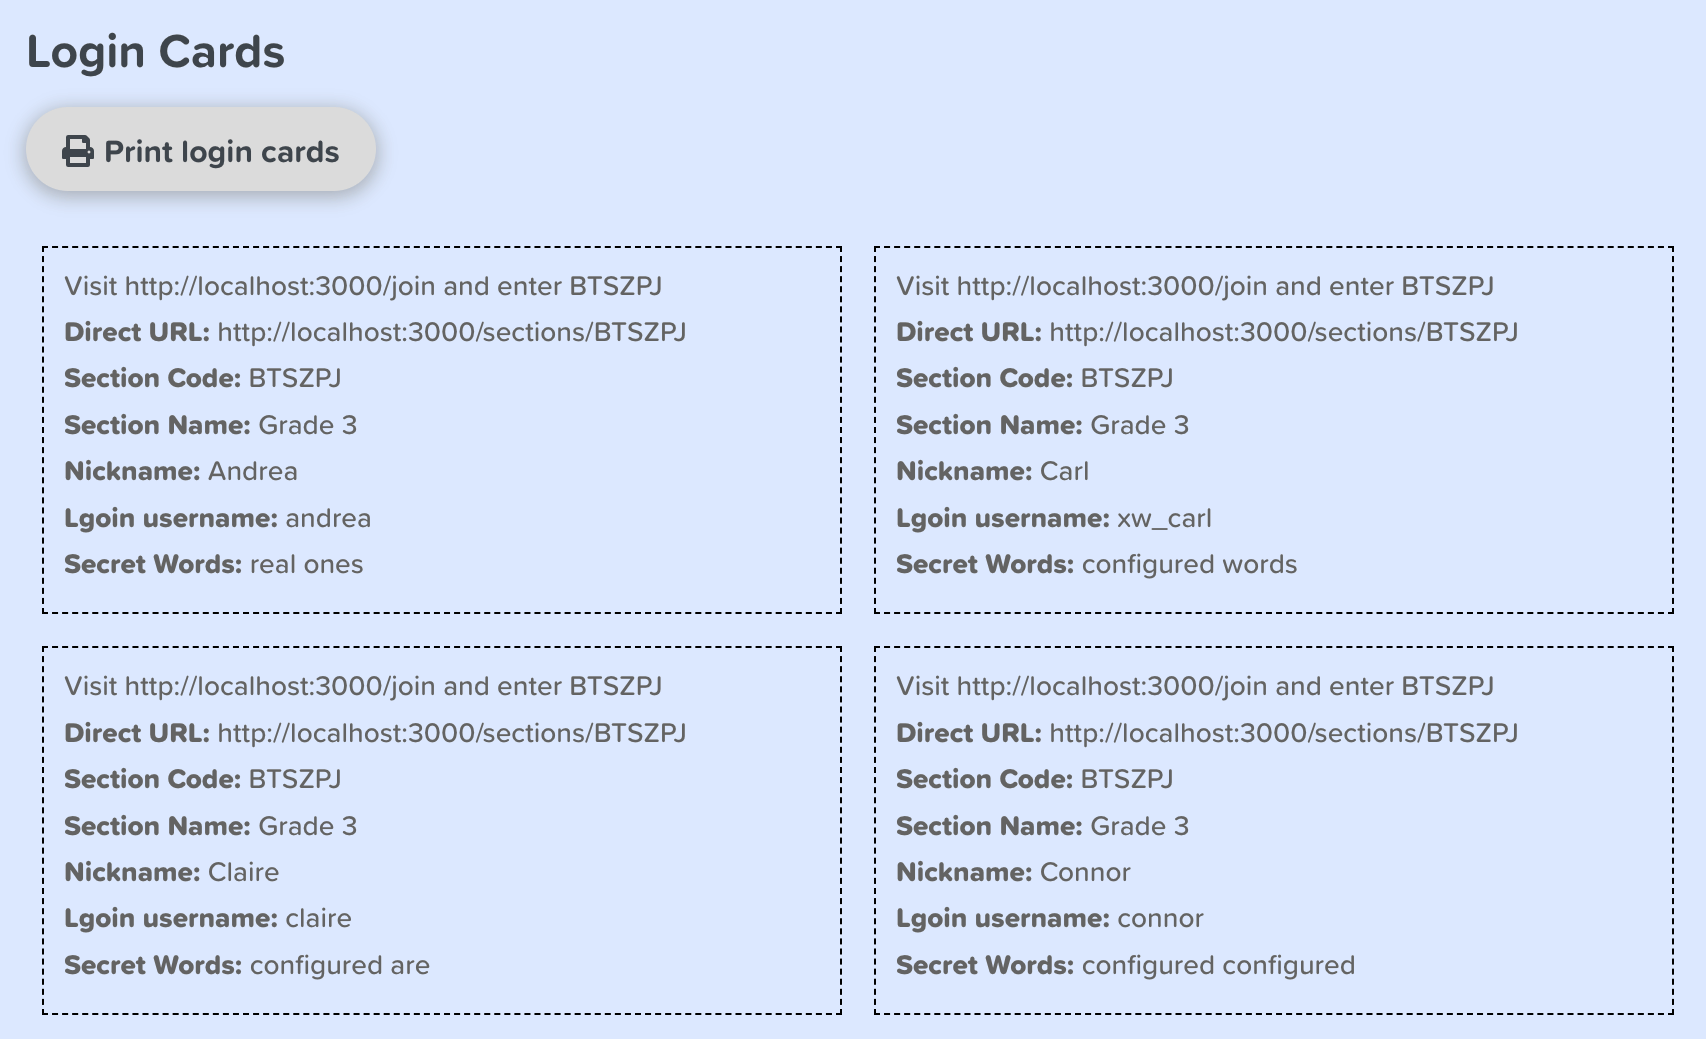
You can get the sign-in information to your students via 'Login Cards'. Login cards contain a direct link to the section's sign-in page, the section code, the student's nickname, their secret words or picture password, and instructions for signing in. Login cards can be printed for either a single student at a time, or bulk printed for the entire class at once.
Login cards look like this:
-
-
For sections with login type of Picture Password or Secret Word, getting students start to learn after signed in!
Once your students have successfully signed in, they will be taken to one of these two places:
-
If you've assigned a course to the section, students will be taken to the course page once they join the section.
-
If you haven't assigned a course to the section yet, students will be taken to their Dashboard Page once they join the section and they can pick and start an activity from there.
-
-
For sections with login type of Personal Email, have students join the section with their own personal accounts.
For sections that are using Personal Email accounts, students will manage their own accounts using their personal emails and their own password.
-
Step 0 - If your students have their own accounts already:
If your students already have their own accounts, ask them to sign in with it to get started (tap the sign-in button in the upper, right-hand corner of the page). Once they have signed in, skip to Step 2.
If your students cannot remember their password, they can request a reset password link from the User Login Page.
-
Step 1 - If your students do not have an account yet:
If they do not have an account yet, they need to create their own accounts by going to User Sign Up Page
Make sure your students set-up "Student" type of accounts (as opposed to "Teacher" type of accounts).
-
Step 2 - Have your students join your section:
Once your students have signed in, they need to open the Join A Classroom Section Page and enter the 6-letter section code of the section you created.
-
Step 3 - Get started!
Once your students have successfully joined your section, they will see a green banner at the top of the page telling them they've successfully joined your section!
-
If you've assigned a course to the section, students will be taken to the course page once they join the section.
-
If you haven't assigned a course to the section yet, students will be taken to their Dashboard Page once they join the section and they can pick and start an activity from there.
-
-
-
-
Track Progress of Your Students
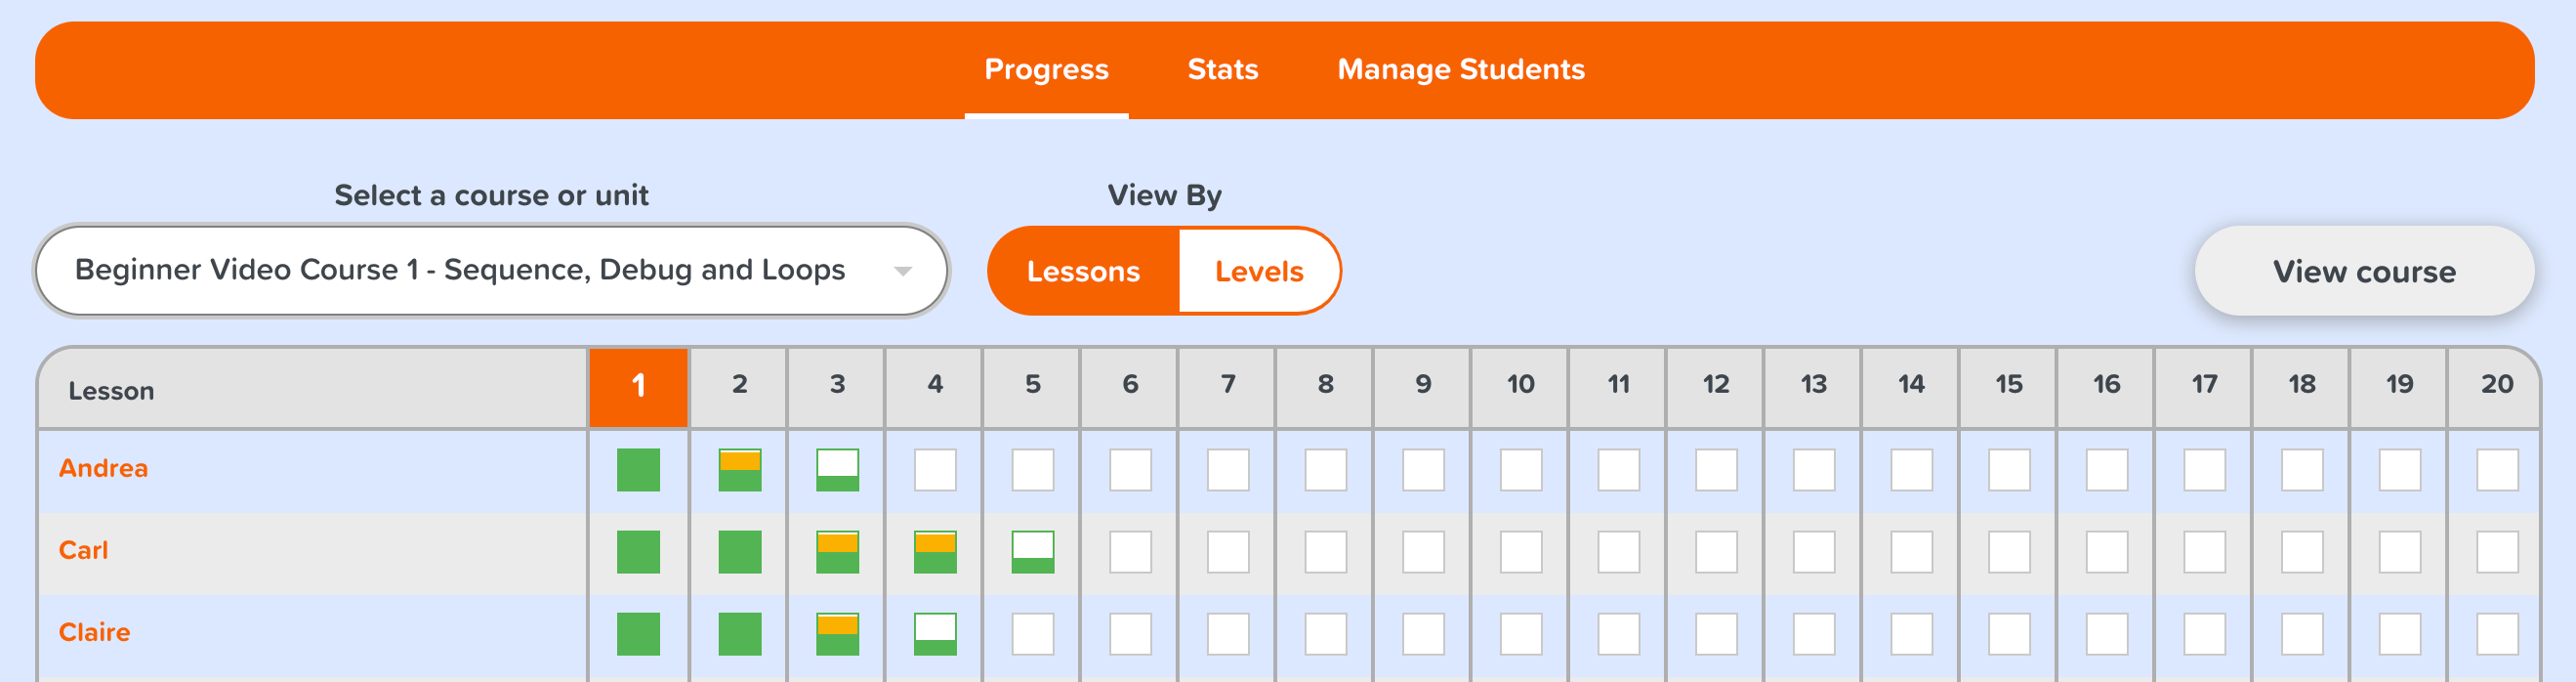
From your Teacher Dashboard Page, click the "Progress" tab in the top navigation bar to view students' progress in the current section. The progress tab shows how individual students are progressing through a Course.
You can view students' progress for entire lessons.
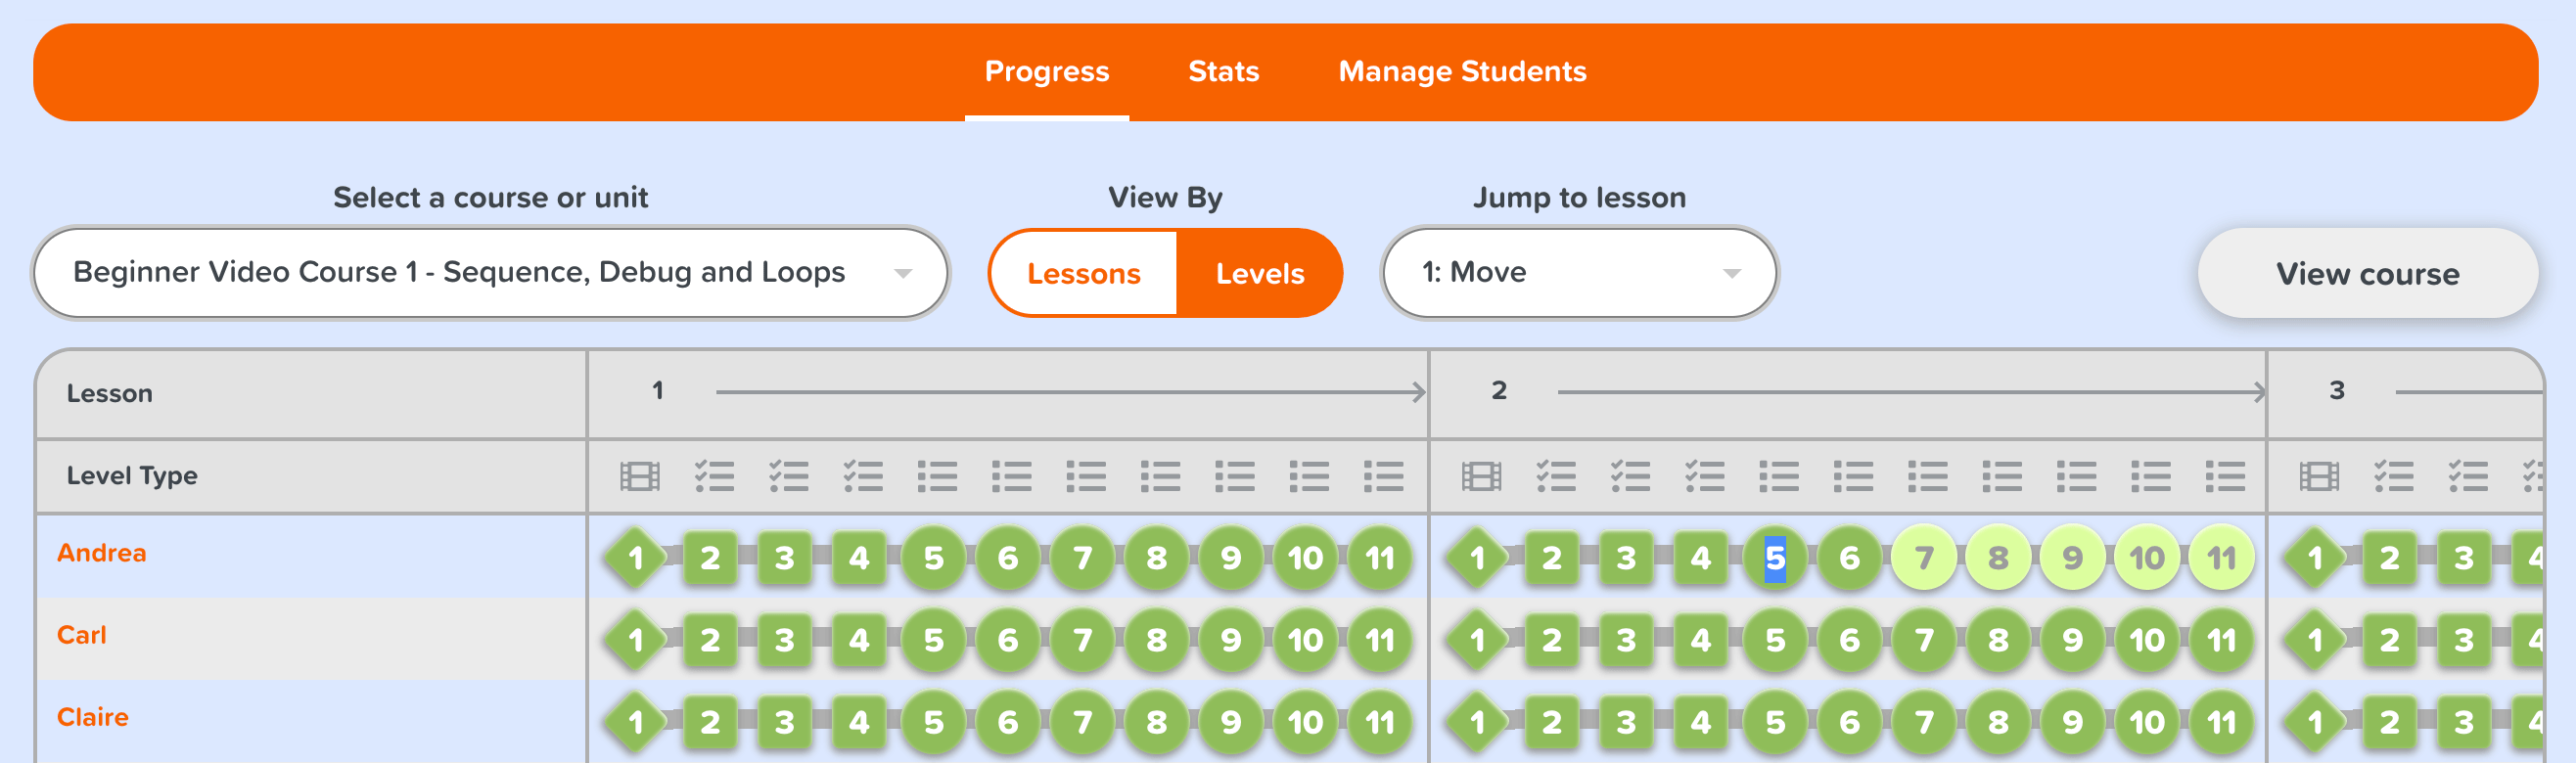
Or zoom in to look at students' progress on individual levels.
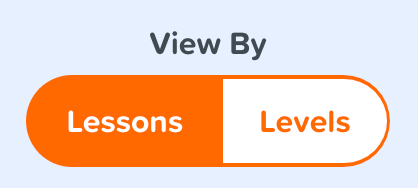
To change the granularity of the view between lessons and levels, use the "View By" toggle button next to the "Select a course or unit" dropdown menu.
The type of each level is denoted in the bar at the top of the progress table.

You can also click the student names in the progress view to get a more detailed view of their progress in the given course page, down to each level indicated by a colored bubble.
-
Payment And Price Introduction
User accounts of the teacher type need to pay before using all the functions mentioned above. After logging in with your teacher account, click the "Buy" link at the top of any page and open the Teacher Membership Plans.
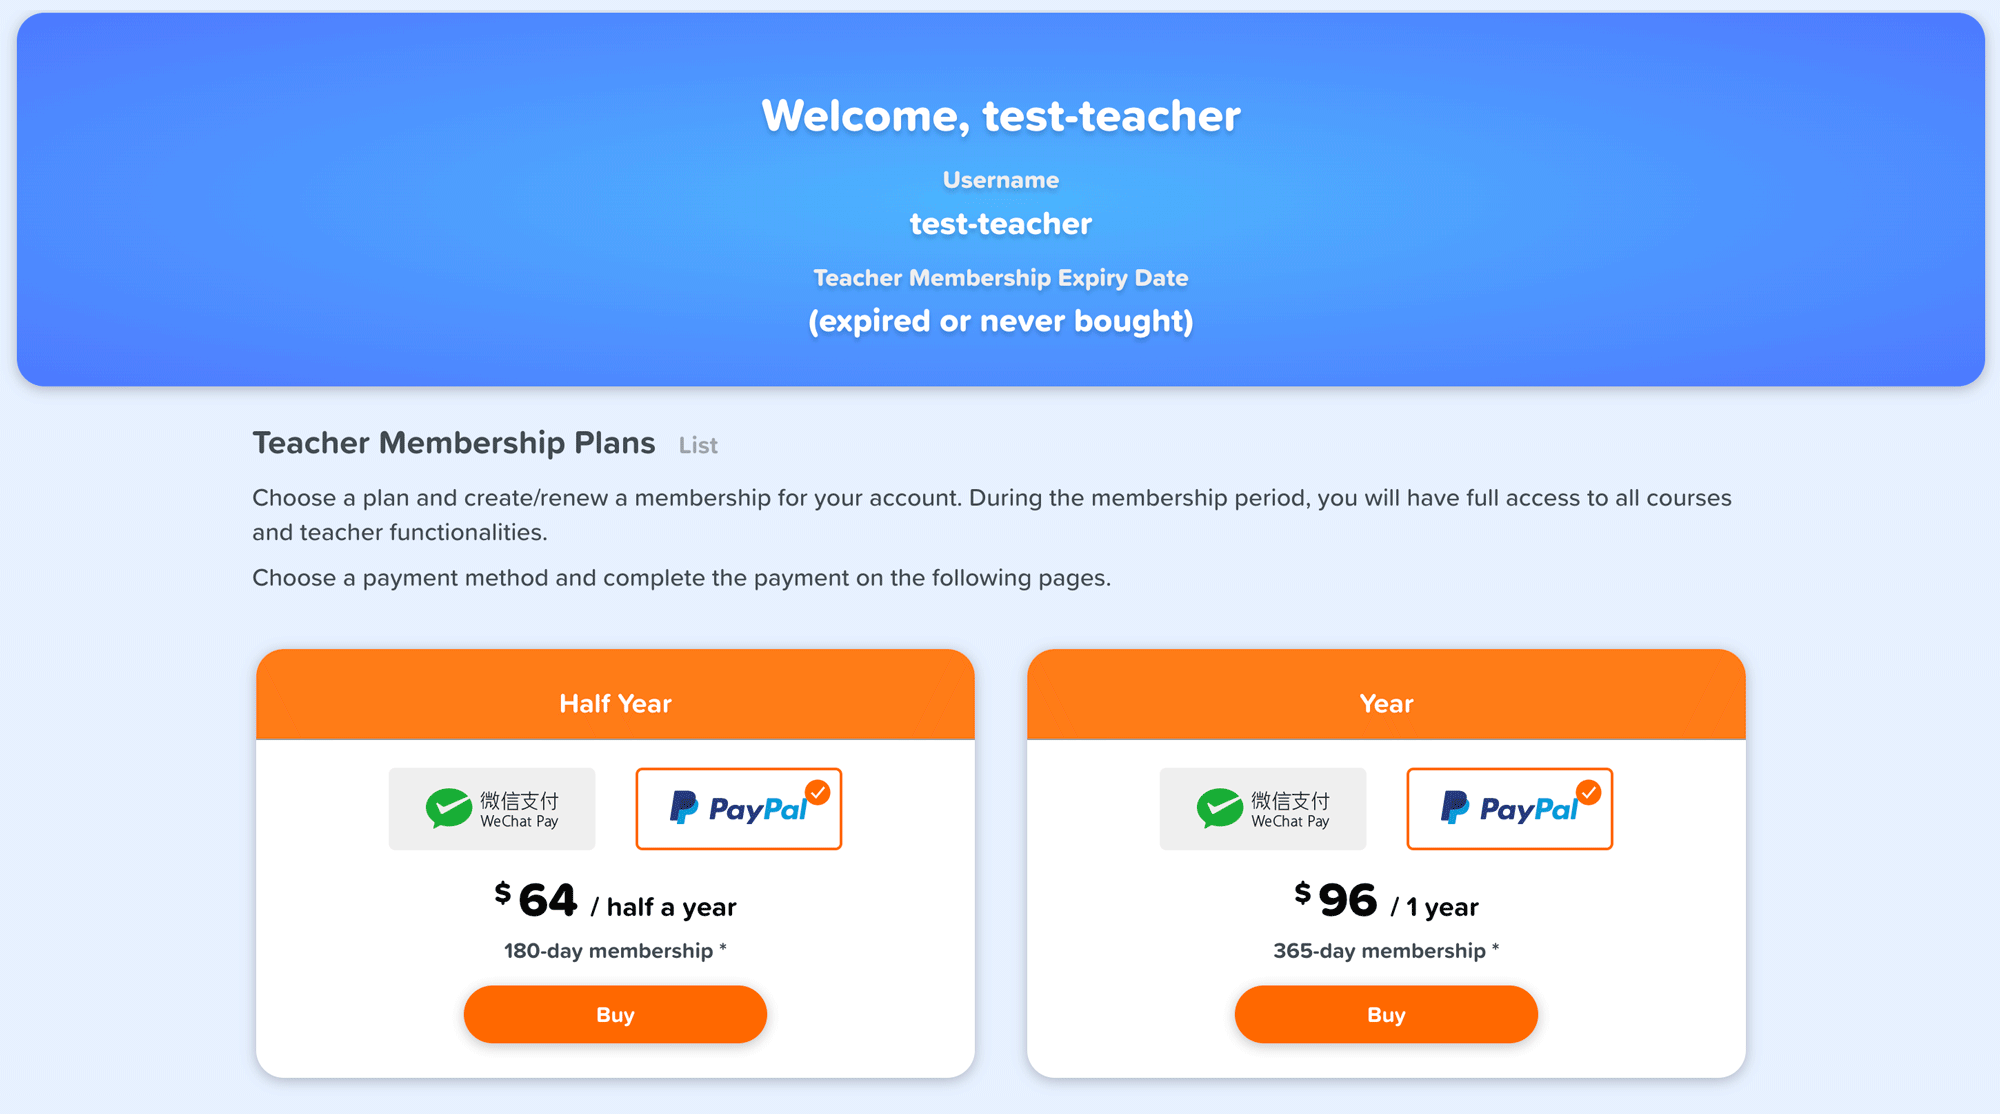
Teacher accounts adopt the membership method, and the membership expiration date will be displayed in the "Teacher Membership Expiry Date" field at the top of the page. You can choose any purchase method to purchase and follow the prompts on the next page to operate. The payment method supports "WeChat Payment" and "PayPal", and you can buy a half-year or one-year membership at a time. The membership expiry date will automatically accumulate if it takes longer for members to make multiple purchases.
The current price of a half-year teacher membership renewal is 64 USD, and the current one-year renewal membership price is 96 USD; if there is a promotion, the prices will have a certain discount on this basis. Please note: The prices mentioned here may change in the future and this manual may not be able to update the price changes in time. All the actual prices on the "Teacher Membership Plans" page shall prevail.
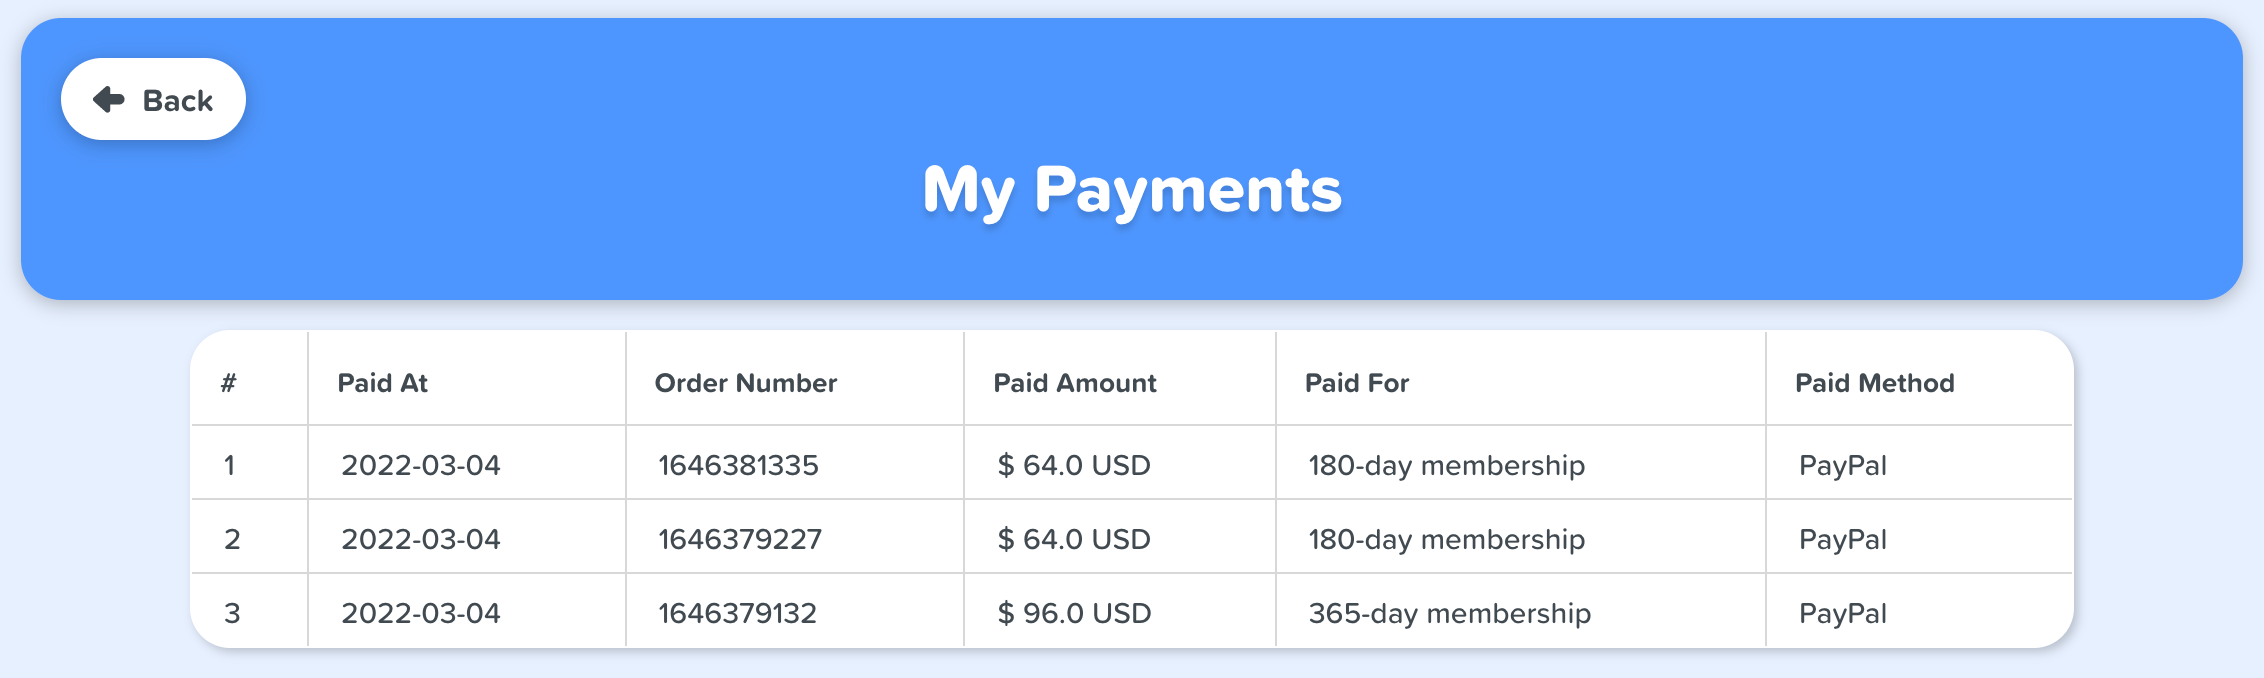
You can open the Payments Page to view all your payment information.
Student accounts created by teachers as well as the ones registered by students themselves, need to pay separately if they want to study paid courses. If they have not paid for the time being, the system will periodically remind them to do this (reminder only), but this will not affect them to follow their teacher to learn courses or use any other functions. Please refer to the Student Manual for more details about this.
In addition to normal promotions, we also provide more flexible and more favorable prices for schools and institutions (especially public schools), for both their teachers and students, such as coupons for both teachers and students, special discounts for any single teacher, package discounts for multiple teachers, and special settings for teachers to get special price discounts for all student accounts they create. For more information you can contact us here.
To wrap up, above we have introduced how to create a teacher type of user account, create classroom sections, assign classroom students, assign courses to classroom sections, track the progress of students, and buy a membership. And besides, just as mentioned, you can also do everything as a student can with a teacher type of user account. Please refer to the Student Manual for other things you can do just like a student.
You can also refer to the following online documentation: